Super Easy, Customizable and Flattering Dress

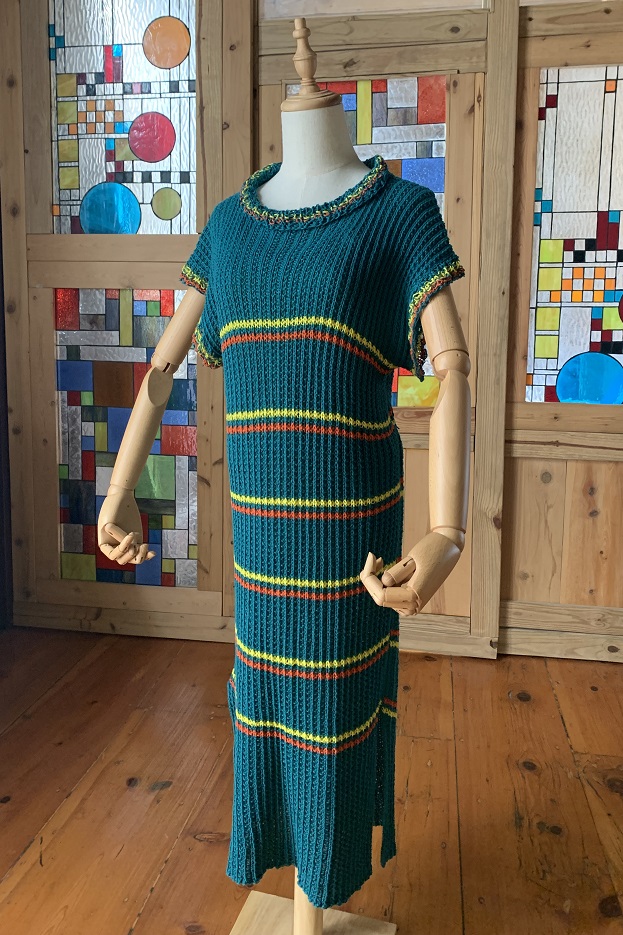
Breezy, cute and comfy – it’s a carefree all-day dress. This one is made in cotton, and you can easily pick your favorite yarns as it will work with pretty much any fiber. It’s super easy to make, like knitting a wide, long scarf with a hole in the center, and all you need is a bit of patience.
Garter rib creates a softly contoured silhouette from flat and straight knitting
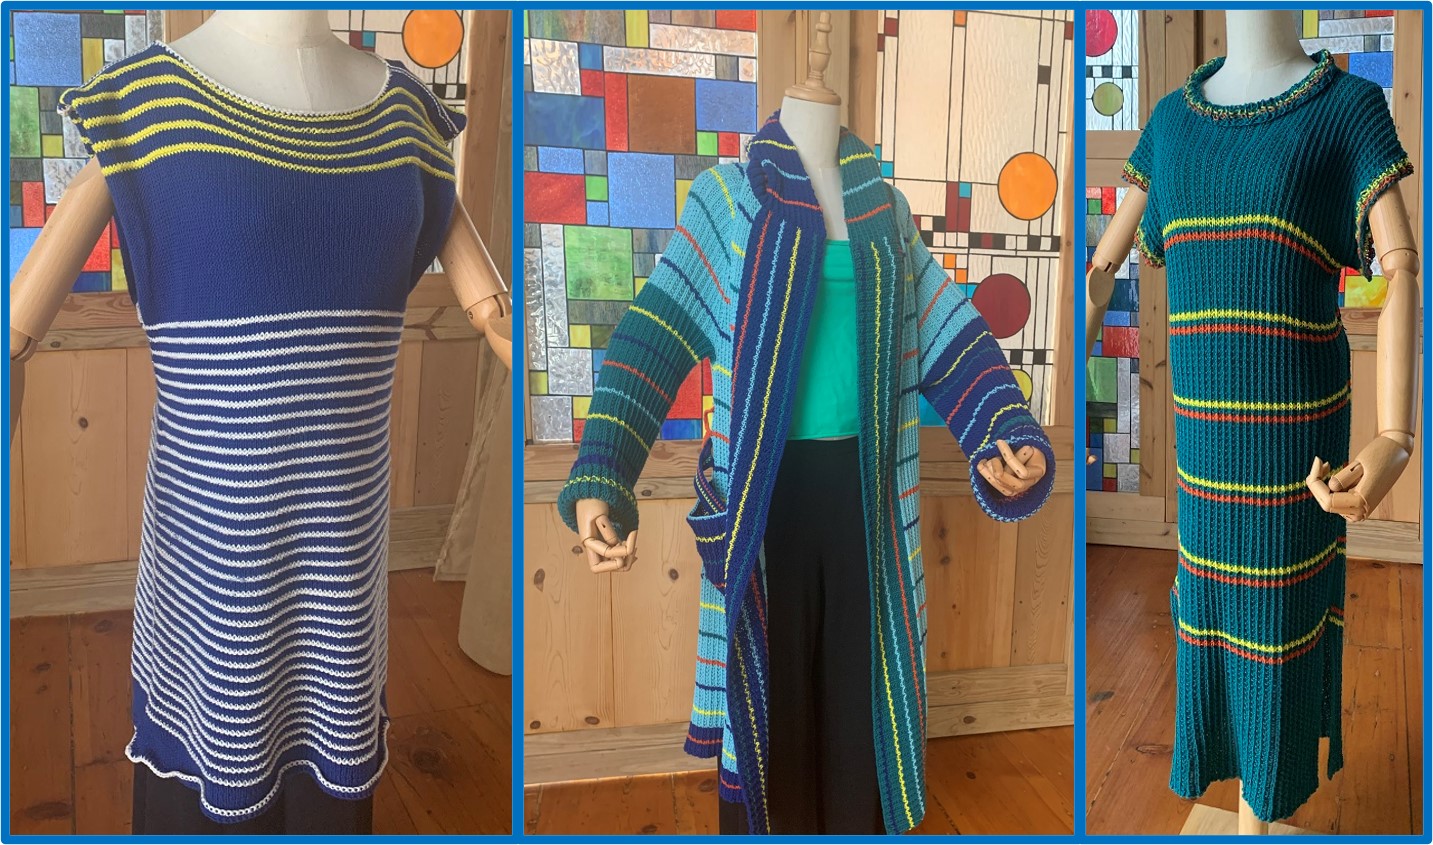
Like the tunic dress (left), this dress started with a desire to use up left-over yarns from the lounge robe (middle) project. I wanted to make it as easy and straightforward as possible, so decided to adapt the garter or broken rib pattern from the robe.
Here are the photos of all three projects side-by-side, with the lounge robe in the middle. You can see how easy it is to play with whimsical patterns with stripes. The possibilities are literally endless.

To show you how easy it is to knit this dress, here’s a photo of the dress before sewing the sides. No joke, it’s like a wide, long scarf with a hole in the center for neckline.

Easy to adjust sizes and details
Because the shape is a simple rectangular with a 3-stitch/2-row rib pattern, you can easily make adjustments in the overall width/lengths (crop top, sweater, mini, mid-calf, maxi), neckline (wide boat neck, knit up a few inches to create a turtle neck, etc.), and side slit lengths. You can also make this a CYA top or dress by making the back side longer. All you need to do is to change the position of neck opening, depending on the difference in lengths you want.
You can easily make the neck and sleeves longer/fuller by simply keep knitting until you reach desired lengths.
In addition, you can change the needle size to make it airier for summer or denser for fall/winter. For this one, I used a larger needle so that the dress is knit breezy enough but not as loose as a see-through.
Carrying up yarns in stripes to avoid weaving numerous ends
As in the navy stripe tunic dress, to avoid weaving numerous ends produced every time you change colors, I opted to “carry up” yarns on the wrong side as in this photo. Basically, on the right side row when you start using a different color yarn, you would wrap the yarn you want to start using behind the working yarn. In this case, Because MC rows go on 20 rows at a time, this means one side becomes somewhat loaded with carried up yarns. Nonetheless, for me, it’s much better than having to weave in many, many ends.

Knitting instructions
Overall construction
This dress is knit in flat, rather loosely, in cotton throughout. It starts with back hem in MC and the stripe pattern begins after about 20 rows and continues until the arm opening. I switched to MC for the arm openings/chest portion because it’s easier later to pick up stitches and knit out arm opening trims/sleeves.
It continues in MC until the neck opening, which is created with a simple BO in RS and CO in WS. Thereafter, you will mirror the back part for the front.
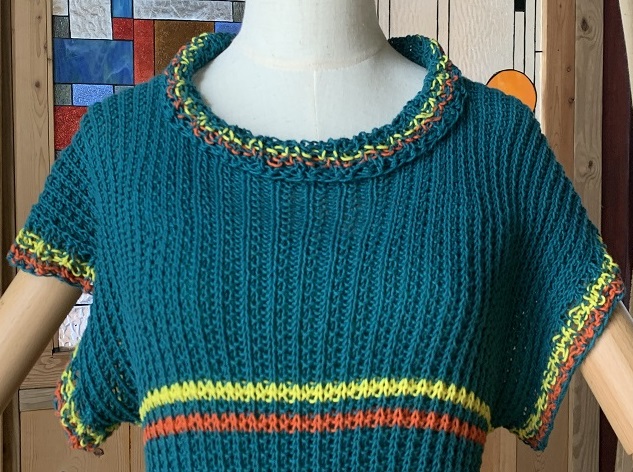
After sewing the sides, using an even larger needle, I knitted short neck and sleeves.
| Yarn | Needle, etc. | Gauge (4”) | Size |
| This example uses Purl Soho’s Cotton Pure (100g/279 yrds). For S/M or X/XL: Main color (MC), 3 or 3-1/2 skeins (760 or 900 yrds) of Peacock Teal. Contract colors 1 & 2 (CC1 & 2), 1 or 1-1/3 skeins each (260 to 320 yrds) of Jonquil Yellow and Tomato Orange. | US #6 (3.5 mm) 32″ or 24″ circular needles to create an airy fabric. This yearn is usually knit #3-5 needles. For neck and sleeves, to create a fluffy look, I used #9 16″ (shortest you have) circular needle. | 24 sts x 20 rows in pattern stitch (garter rib). | The size is truly variable based on your preference. This one is about 40″/46″ width, and 45″/48″ in length. |
Abbreviations
RS – right side
WS – wrong side
k – knit
p – purl
CO – cast on
BO – bind off

Stripe pattern
This 26-row stripe pattern consists of 20 MC rows followed by 2 rows each of C1 – MC – C2. Please feel free to experiment with different stripe patterns. In the the lounge robe post, you see how I played around with various stripe options using similar color ways before setting on one of the options.
Pattern stitch – garter rib
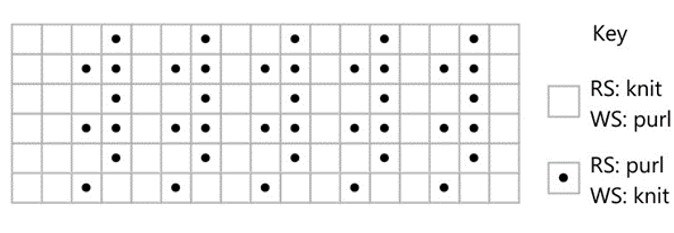
Garter ribs gives you a cushy, soft, and reversible fabric that lets the air through and absorbs moisture. Importantly for this dress, the fabric softly contracts and expands according to your body shape, which creates a flattering silhouette. There are many varieties, and here I used a simple 3-st repeat of k, k, p. In flat, it’s the same on every row. In round (neck and sleeves), every 2nd row is k, p, p.

Back bottom hem to neck opening:
- With MC, loosely CO 123/141 sts onto a circular needle.
- R1 – Start the pattern stitch with one extra knit stitch in the beginning and two extra knit stitches at the end, i.e., k1 + repeat *k,k,p* 40/46 times until the two stitches left + k2.
- R2 (WS) – p2 + repeat *k,k,p” until one stitch left + p1.
- Repeat R1 & R2 9/13 more times until R20/R28, 8″/9″, or longer if you want a longer side slit.
- Begin 26-row stripe pattern for back:
- BSR1 – BSR20 (stripe rows 1 to 20) – Continue pattern st with MC.
- BSR21 & BSR22: Pattern st on RS/WS with CC2.
- BSR23 & BSR24: Pattern st on RS/WS with MC.
- BSR25 & BSR26: Pattern st on RS/WS with CC1.
- Continue BSR1-BSR26 until the arm opening, about 6 stripe patterns.
- For the length of desired arm opening, approximately 10″/12″, continue pattern st in MC, ending with WS.
Work on neck opening with MC:
- Depending on the desired width of neck opening, divide the the row in three sections, i.e., right shoulder + neck opening + left shoulder. In this case, approx. 1/3 each, i.e., 40/46 + 42/48 + 41/47, or 6.5″/7.5″ + 7″/8″ + 6.5″/7.5″.
- RS: Work on pattern st for 40 sts (i.e., k1 + 13/15 ribs), loosely BO 42/48 sts., and work on pattern st until the end (i.e., 13/15 ribs + k2).
- WS: Work on pattern st for 41/47 sts. (i.e., p2 + 13/15 ribs), CO 42/48 sts. (I used backward loop CO), and work on pattern st until the end (i.e., 13/15 ribs + p1).
Continue to knit front section and resume stripe pattern:
- Continue pattern st in MC until the bottom of arm opening, i.e., 10″/12″.
- Resume 26-row stripe pattern in reverse order:
- FSR1 – FSR2 (front stripe rows 1 to 2) – Pattern st on RS/WS with CC1.
- FSR3 & FSR4: Pattern st on RS/WS with MC.
- FSR5 & FSR6: Pattern st on RS/WS with CC2.
- FSR7 & FSR26: Pattern st on RS/WS with MC.
- Continue FSR1-FSR26 for 6 stripe patterns.
- Continue 20 more rows of pattern st with MC.
- Very loosely BO.
Assemble and complete neck and sleeves
- First, sew each side, starting with the bottom of side slit up to the bottom of armhole.
- Neck:
- Using #9 16″ circular needle, with MC, pick up all stitches from both front & back necks.
- Continue to work in pattern st in round with MC for 4 rows.
- With CC1, work pattern st in round for 2 rows.
- With MC, work pattern st in round for 2 rows.
- With CC2, work pattern st in round for 2 rows.
- With MC, work pattern st in round for 2 rows and very loosely CO.

Each sleeve:
- Using #9 16″ circular needle, with MC, pick up stitches from armhole, about 3 sts per each 4 rows.
- Continue to work in pattern st in round with MC for 2 rows, or more if you would like a longer sleeve.
- With CC1, work pattern st in round for 2 rows.
- With MC, work pattern st in round for 1 rows (I kept it to one row because I was running out of the yarn. Otherwise, I probably made it to 2.)
- With CC2, work pattern st in round for 2 rows.
- With MC, work pattern st in round for 1 row and very loosely CO.
Weave ends, block as desired, and enjoy!


Leave A Comment