Easy Snazzy Summer Fun Knitted Tunic Dress (Free Pattern)
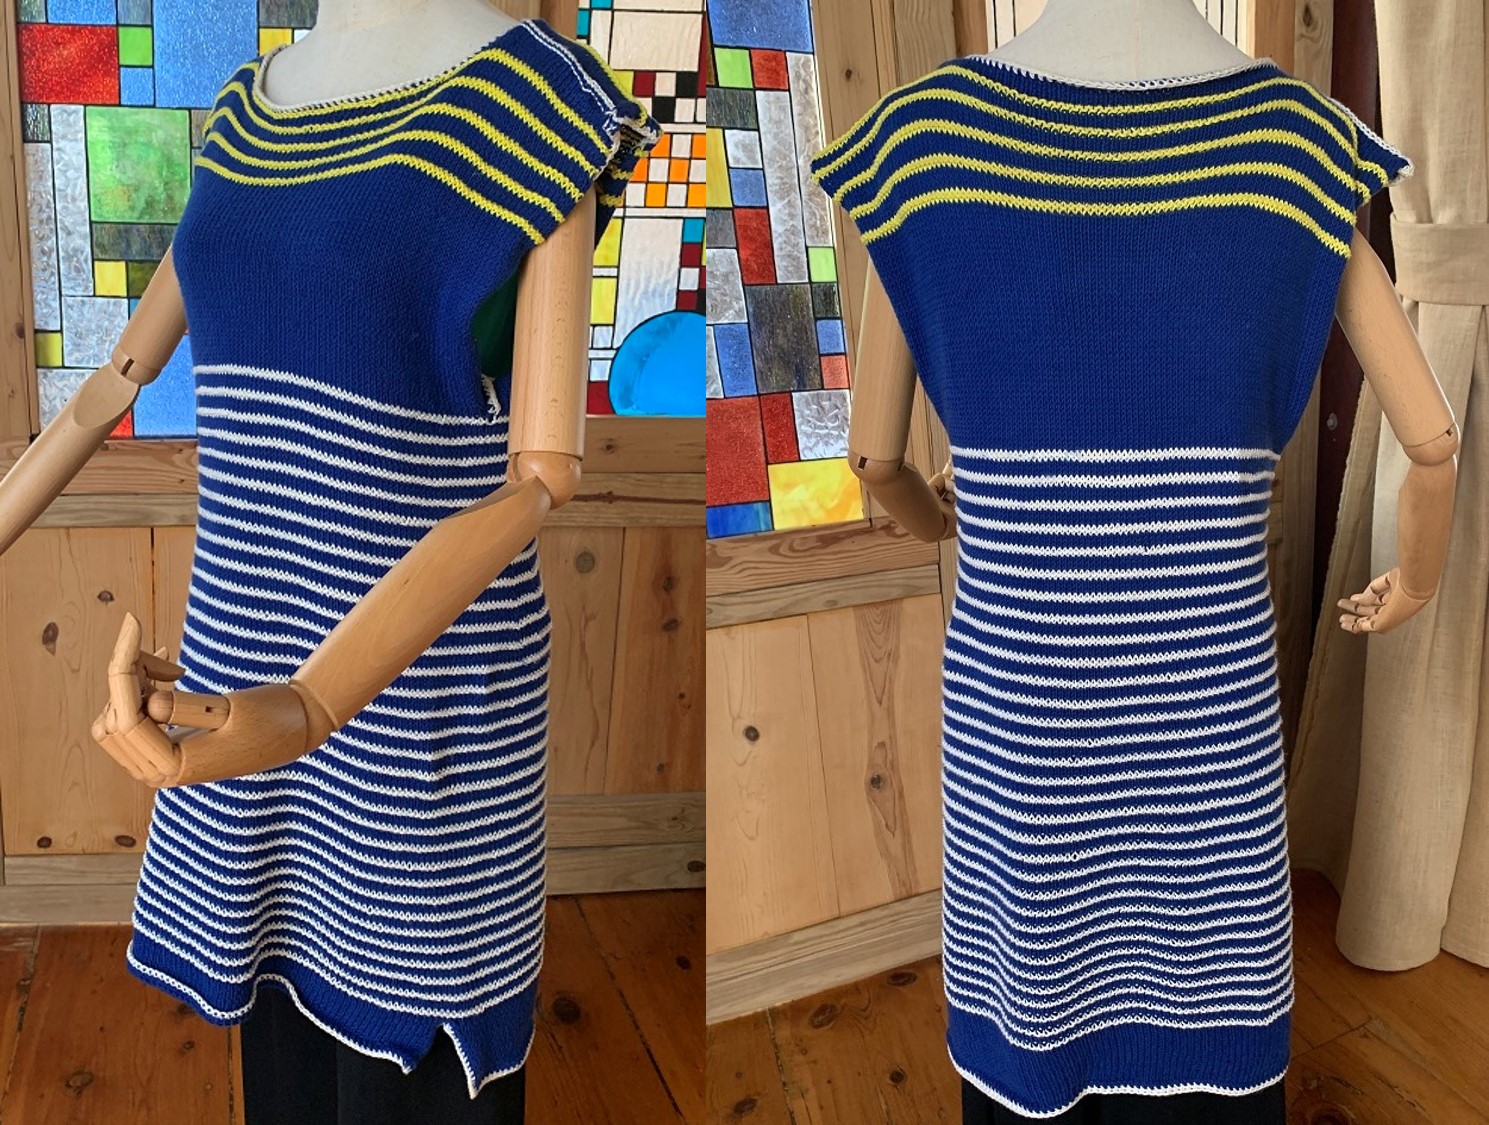
While this fun and easy tunic dress is knit straight bottom up in a simple stockinette/purl stripe pattern, when you wear it, somehow it looks surprisingly sleek and contoured, likely because of the stripe. It’s a quick summer knit project!
Fun stripe projects with left-over yarns
When I found myself with a few skeins of left-over cotton yarns from my hooded robe project, I contemplated a few options to use them up – vest, shirt, tote bag, etc. Because they were mainly in blue and green colors with bits of white/yellow/orange, after some searching, I settled on two separate, quick projects – a nautical themed tunic and a green stripe midi-dress. Left-over yarn projects require you to make compromises and improvisations in patterns, which is sort of fun. Incorporating stripe patterns is a relatively easy way out to use up small volume yarns in different colors.
Standard stripe shirt as starting point
As I was thumbing through various design ideas, I came across this Striped Spring Shirt from Purl Soho, and decided to adapt it for a summer tunic project. A shirt is nice, but I thought a breezy CYA top/dress for the summer would be even more practical. The reason the white stripes end just above the waist and yellow stripes begin at the shoulder is primarily due to the amounts of yarns I had to work with. Basically, I ran out of white and yet wanted to resume the stripe pattern, so switched to yellow, and it actually ended up being an interesting pattern (I think.)
Easy design options
This is primarily knit bottom up in round until the arm holes and then front and back separately in flat. A few options you can decide to incorporate or skip:
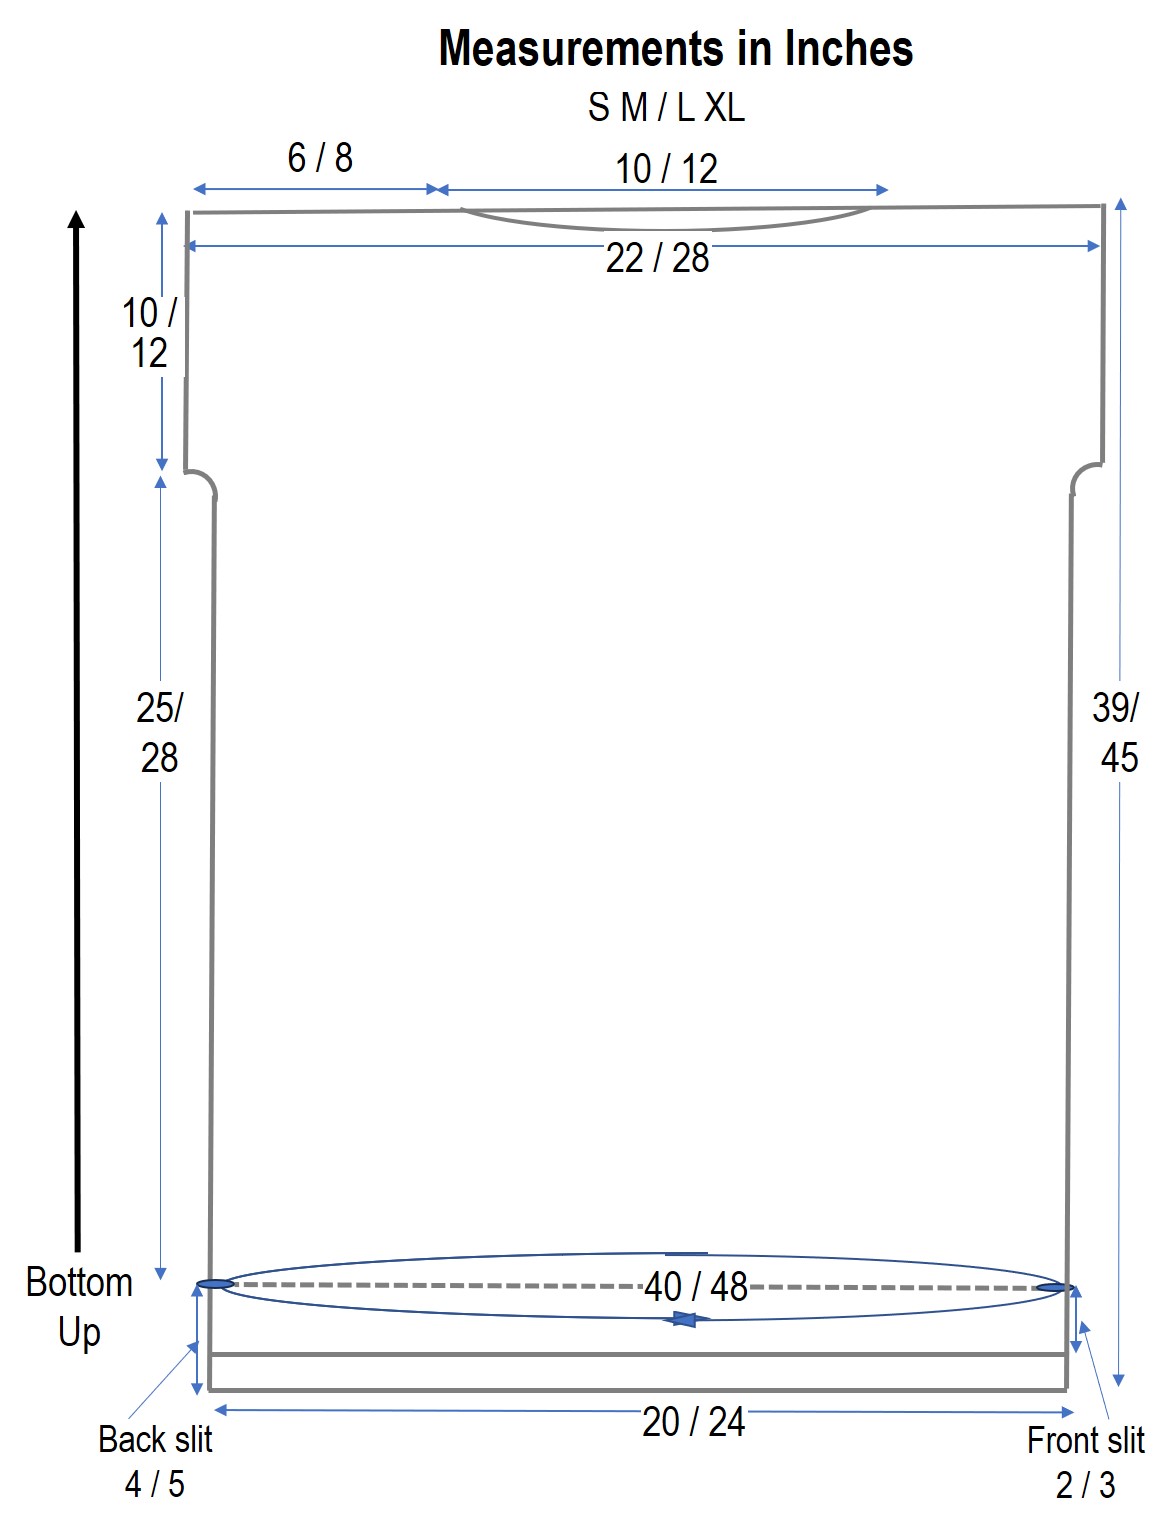
- Tiny side slits – to create side slits, you would knit front and back separately in flat for as long as the length of the slits you would like and join them to start knitting in round. In this case, I opted for a short, 4″ (or 5″ for X/XL) inch slits.
- Tad longer in the back – you can certainly make front and back the same length. I wanted the back to be just a bout 2″ longer.
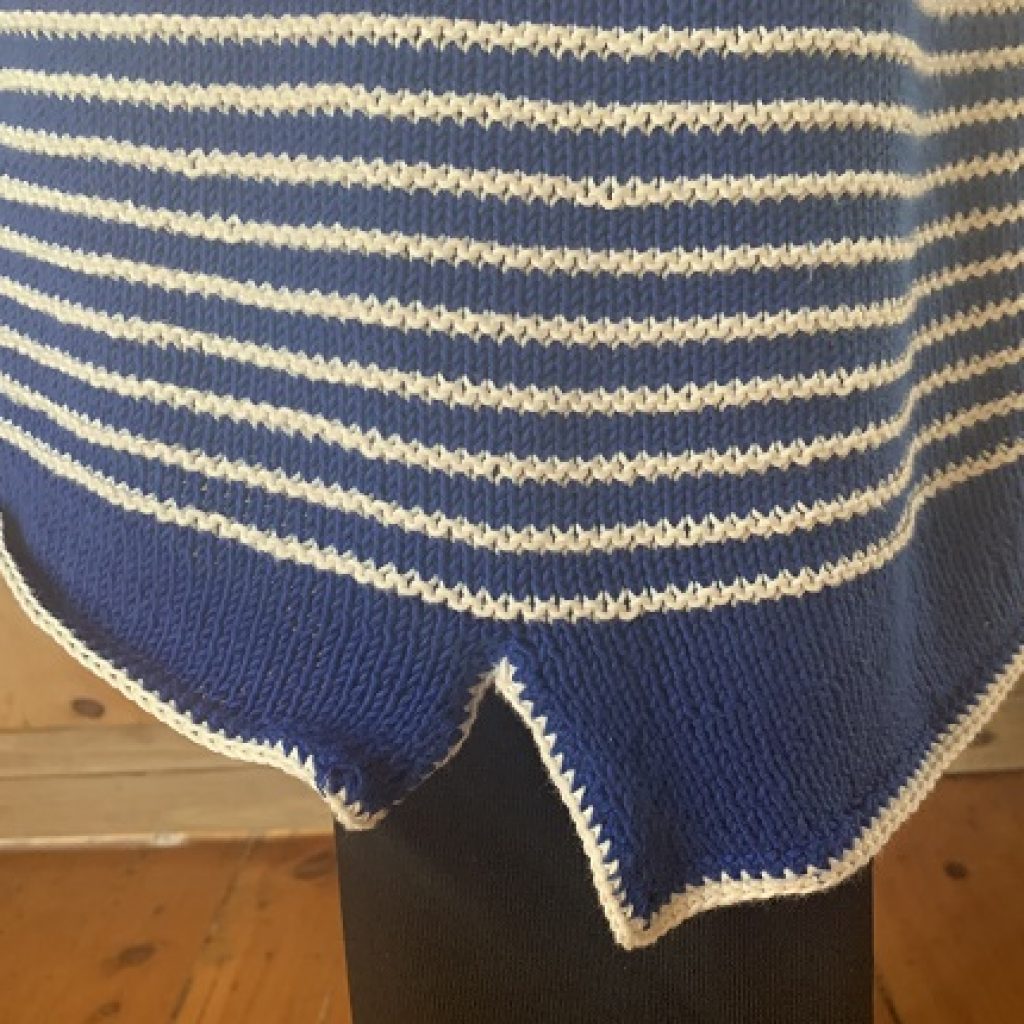
- Hem trims – I did not choose a typical bottom hem like rib or garter stitches, so the hem looks a bit curled up. Personally, I am fine with it, and to mitigate curling, I used single crochet stitches in white.
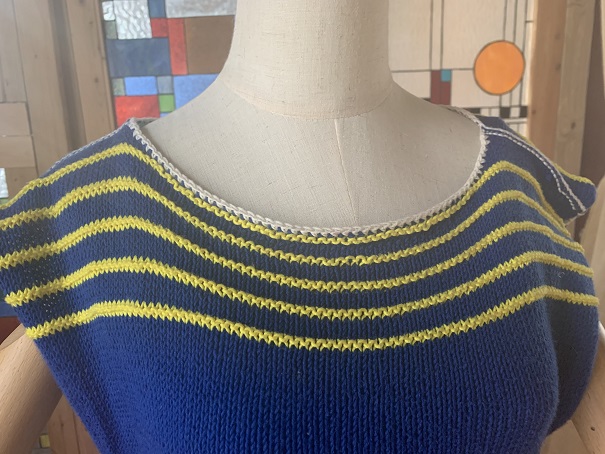
- Neck opening – I like a boat neck, and this one has a slight contour on the front neck opening only.
- Sleeves – I opted for slight “sleeves” by adding a few stitches at the bottom of arm holes. You can forego COs and keep knitting in the rectangular shape.
Carrying up yarns in stripes to avoid weaving many ends
In knitting repetitive stripes, to avoid weaving numerous ends produced every time you change colors, it’s common to “carry up” yarns on the wrong end, which I did (not so beautifully as you can see.) It’s basically, when you start using a different color yarn, wrapping the yarn you want to start using behind the working yarn. It looks something like this photo from the back.

Knitting instructions
This tunic dress is knit bottom up in round straight up. I added side slits and made back slightly longer than the front. If you’d forego the slits, you can basically start in round until the arm hole split.
Because it’s basically in a rectangular shape knit in stockinette or purl stitches throughout, you can easily make size adjustments as you knit. For example: to make the piece roomier, simply add more stitches in the beginning; to make slits longer, add more rows before joining back and front; to make the arm holes roomier, add more rows after dividing front and back; to make the neck opening narrower, BO more sts in the center, etc. Feel free to create the piece that will fit you the best!
| Yarn | Needle, etc. | Gauge (4”) | Construction |
| This example uses Purl Soho’s Cotton Pure (100g/279 yrds). For S/M or X/XL: Main color (MC), 2 or 2-1/3 skeins (550 or 630 yrds) of Ultramarine Blue. Contract color 1 (CC1), 1 or 1-1/3 skeins (260 to 320 yrds) of Heirloom White. CC2, about ¼ skein (60 – 70 yrds) of Jonquil Yellow. | US #5 (3.25 mm) 32″ and 24″ circular needles. I have a loose gauge, so used #4*. F or #8 crochet hook. 4 stitch holders. | 21 sts x 24 rows in stockinette stitch (st st). | Start with back and front hems separately knit in flat and join them to knit in round until the arm separation. Knit front & back separately and join at the shoulders. Single crochet st trim in CC1. |
Abbreviations
| RS – right side WS – wrong side k – knit p – purl | CO – cast on BO – bind off m – stitch marker pm – place marker sm – slip marker | k2tog: knit two together p2tog: purl two together |
Stripe pattern
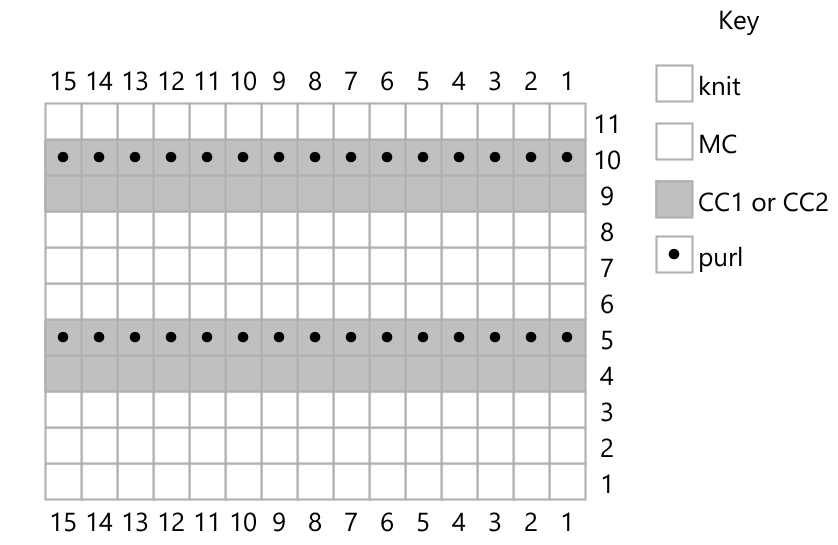
This easy, 5-row repeat stripe pattern (consisting of 3 rows of st sts in MC and 1 row of purl st and 1 row of st st in CC1 or CC2) creates an interesting and low-key relief texture. The only tricky part is to carry up MC and CC1 or CC2 yarns to form stripes. To do that with least distractions (i.e., ends to weave in), at the beginning of the round to switch yarns, you would want to bring the yarn you want to switch to by wrapping it behind MC and up (see above). Make sure you leave some slack or give so that the side body does not become too taut.
Start with bottom hems to body
- Back hem: With MC, CO 100 (120) sts onto the shorter circular needle. Knit in st st (RS knit/WS purl) until it measures 4″/5″ or your desired slit length, ending with RS.
- Front hem: With MC, CO 100/120 sts onto the longer circular needle. Knit in st st (RS knit/WS purl) until it measures 2″/3″ or your desired slit length, ending with RS.
- Join front & back: PM at the end of front hem (m1) and knit the back hem onto the same, longer circular needle. PM at the beginning of front hem (m2) and join to knit in round. Continue to knit 4 more rows in MC.
- Begin stripe pattern:
- R1: With CC1, knit 1 R
- R2: With CC1, purl 1 R
- R3 – R5: With MC, knit
- Body until the armholes: Repeat R1-5 31/35 times until the piece measures approx. 25″/28″ from the joined edge, ending after a row of MC st st.
Knit front and back separately until shoulder
Front and back are knit identically until the neckline. Back has a straight neckline and front has a slight contour.
- Divide front and back: Remove m1 and knit 100/120 sts until m2. Place the remaining 100/120 sts for front on a st holder or the shorter circular needle.
Back section:
- Shape back sleeves via additional COs:
- Continued R1 (RS): CO 6/10 sts
- R2 (WS): Turn and purl until the end of the row and CO 6/10 sts. 112/140 sts total.
- R3++: Continue to knit RS and purl WS in MC until the arm hole measures 6″/8″, ending with RS
- Begin back stripe with CC2 until shoulder:
- 5 stripes for SM
- R1 (WS): With CC2, purl 1 R
- R2 (RS): With CC2, purl 1 R
- R3 – R5 (WS/RS/WS) : With MC, purl/knit/purl
- R6 (RS): With CC2, knit 1 R
- R7 (WS): With CC2, knit 1 R
- R8 – R10 (RS/WS/RS) : With MC, knit/purl/knit
- Repeat R1-10 twice
- Do another round of R1-5 only
- With MC, knit 2R each of RS/WS
- 6 stripes for X/XL
- R1 (WS): With CC2, purl 1 R
- R2 (RS): With CC2, purl 1 R
- R3 – R5 (WS/RS/WS) : With MC, purl/knit/purl
- R6 (RS): With CC2, knit 1 R
- R7 (WS): With CC2, knit 1 R
- R8 – R10 (RS/WS/RS) : With MC, knit/purl/knit
- Repeat R1-10 three times
- With MC, knit 2R each of WS/RS/WS
- 5 stripes for SM
- Complete back: In the last RS,
- Right shoulder: Knit 30/40 sts and transfer them to a stitch holder.
- Back neckline: BO 52/60 sts loosely.
- Left shoulder: Knit 30/40 sts and transfer them to a stitch holder.
Front section:
- Shape front sleeves via additional COs:
- Continued R1 (RS): CO 6/10 sts
- R2 (WS): Turn and purl until the end of the row and CO 6/10 sts. 112/140 sts total.
- R3++: Continue to knit RS and purl WS in MC until the arm hole measures 6″/8″, ending with RS
- Begin front stripe with CC2 until shoulder:
- 5 stripes for SM
- R1 (WS): With CC2, purl 1 R
- R2 (RS): With CC2, purl 1 R
- R3 – R5 (WS/RS/WS) : With MC, purl/knit/purl
- R6 (RS): With CC2, knit 1 R
- R7 (WS): With CC2, knit 1 R
- R8 – R10 (RS/WS/RS) : With MC, knit/purl/knit
- Repeat R1-10 twice
- Do another round of R1-3 only, ending with WS on MC.
- 6 stripes for X/XL
- R1 (WS): With CC2, purl 1 R
- R2 (RS): With CC2, purl 1 R
- R3 – R5 (WS/RS/WS) : With MC, purl/knit/purl
- R6 (RS): With CC2, knit 1 R
- R7 (WS): With CC2, knit 1 R
- R8 – R10 (RS/WS/RS) : With MC, knit/purl/knit
- Repeat R1-10 two times.
- Do another round of R1-9 only, ending with WS on MC
- 5 stripes for SM
- Complete front:
- Front neck contour: Worked over 6 rows
- R1 (RS): Knit 36/48 sts and loosely BO 40/44 sts, then knit 36/48 sts to the end.
- Right side:
- R2 (WS): Purl 36/48 sts to the end.
- R3 (RS): BO 3/4 sts and knit 33/44 sts to the end.
- R4 (WS): Purl 31/42 sts, p2tog once at the end.
- R5 (RS): BO 1/1 st and knit 30/41 sts.
- R6 (WS):
- S/M: Purl 30 sts and transfer all sts. to a stitch holder.
- X/XL: Purl 39 sts, p2tog once, and transfer all sts. to a stitch holder.
- Left side:
- R2 (WS): B/O 3/5 sts and purl 33/44 sts to the end.
- R3 (RS): Knit 31/42 sts, k2tog once at the end.
- R4 (WS): P2tog once, purl 30/41 sts.
- R5 (RS): Knit 29/40 sts, k2tog once.
- R6 (WS):
- S/M: Purl 30 sts and leave all sts on the circular needle.
- X/XL: P2tog once, and purl 39 sts, and leave all sts on the circular needle.
- Front neck contour: Worked over 6 rows
Trim and finish:
- Shoulders (one shoulder at a time):
- Transfer sts on the back left or right shoulder to the other end of the working circular needle.
- Bring both tips of the circular needle together and pick up a strand of CC1.
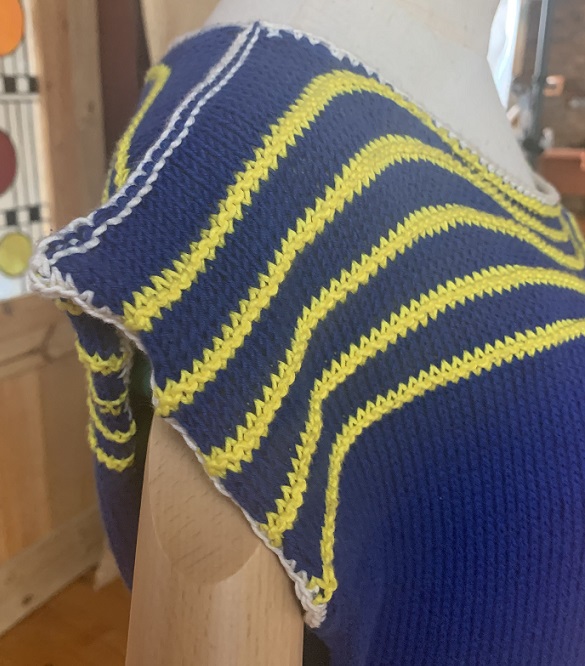
- Using the other circular needle, BO both front & back sts together one st at a time with CC1. The shoulder line will look like the photo above.
- If you prefer the shoulder seam to be less visible, do the same procedure using MC.
- Neck trim: Using CC1, crochet either one row of either slip or single st.
- Arm trim:
- Under arm: starting with the end closer to the body, seam the each underarm with CC1 using one row of slip or single crochet st.
- Arm trip: Continue to crochet the arm trim using one row of slip or single st. If you don’t like the way the arm trims curl up, add another row of crochet st.
- Hem and slit trim: With CC1, crochet the hems and slits using single st. Because the hems tend to curl up, I added another rows of single crochet sts on both hems.
Weave ends, block as desired, and enjoy!


Leave A Comment