Hooded robe to lounge in all day
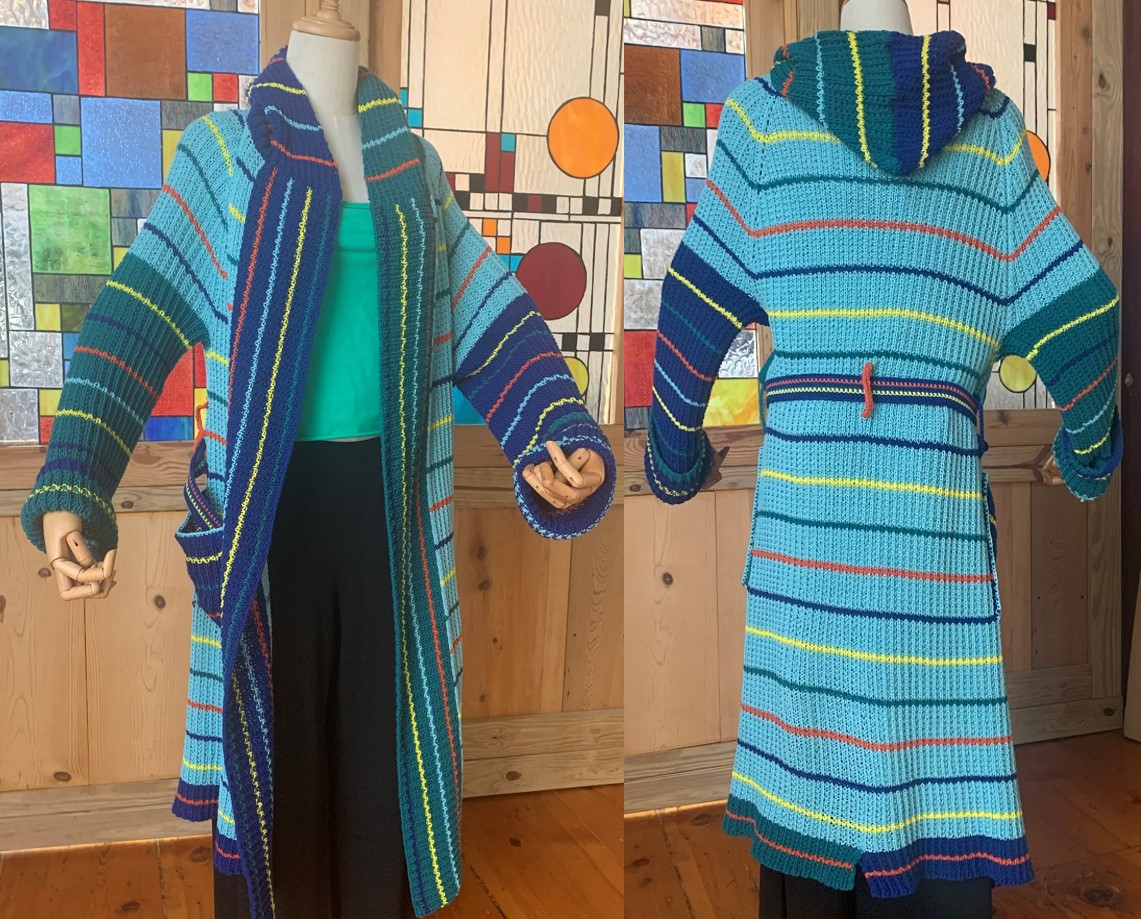
Want to live in it all day, every day
If you are spending a lot of time at home, what do you like most to lounge in all day? What about a comfy and cushy robe you can put on as both a bathrobe and a lounge wear?
Over the years, probably like many of you, I’ve purchased different kinds of robes and found all of them falling short in some way – too thick & heavy, too light and not enough coverage, too long, too short, not comfy enough to lounge in after you dried up, etc. So, when I ended up with several skeins of 100% cotton, sport-weight yarns via an impulse purchase, I decided to try a hand at knitting my “perfect” bath & lounge robe.
Main criteria were:
- Color pop – something bright & fun to cheer me up, if needed, particularly in the morning.
- Fabric – absorbs and wicks moisture after taking a shower or bath.
- Weight – solid enough to keep me warm, but not heavy to weigh me down.
- Texture – soft and cushy without being too thick.
- Size – roomy throughout.
- Length – long enough to provide a good coverage, but not too long to drag on the floor.
- Closure – to prevent it from loosening and opening unintentionally.
- Hood! – to keep the back of the neck warm and to help dry my hair after a wash without making my back too wet.
- Pockets – large pockets on both sides.
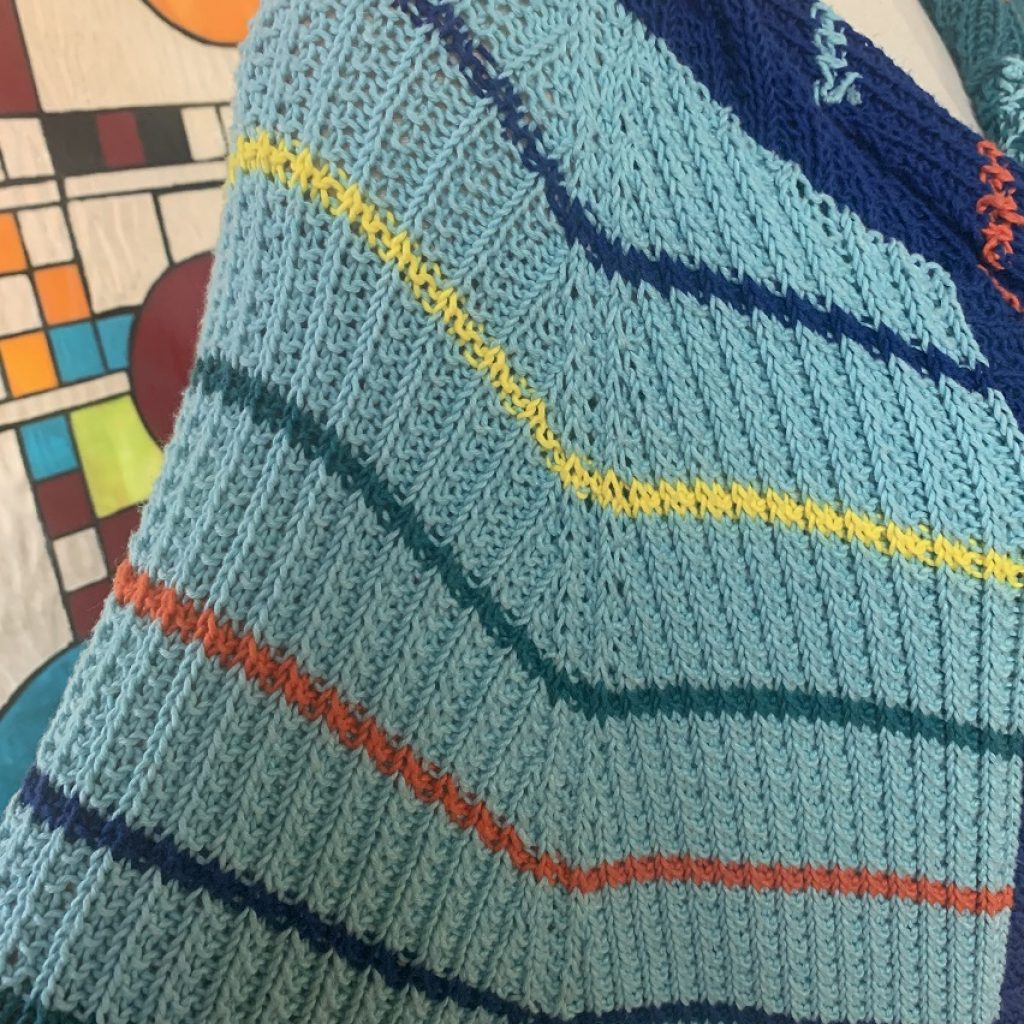
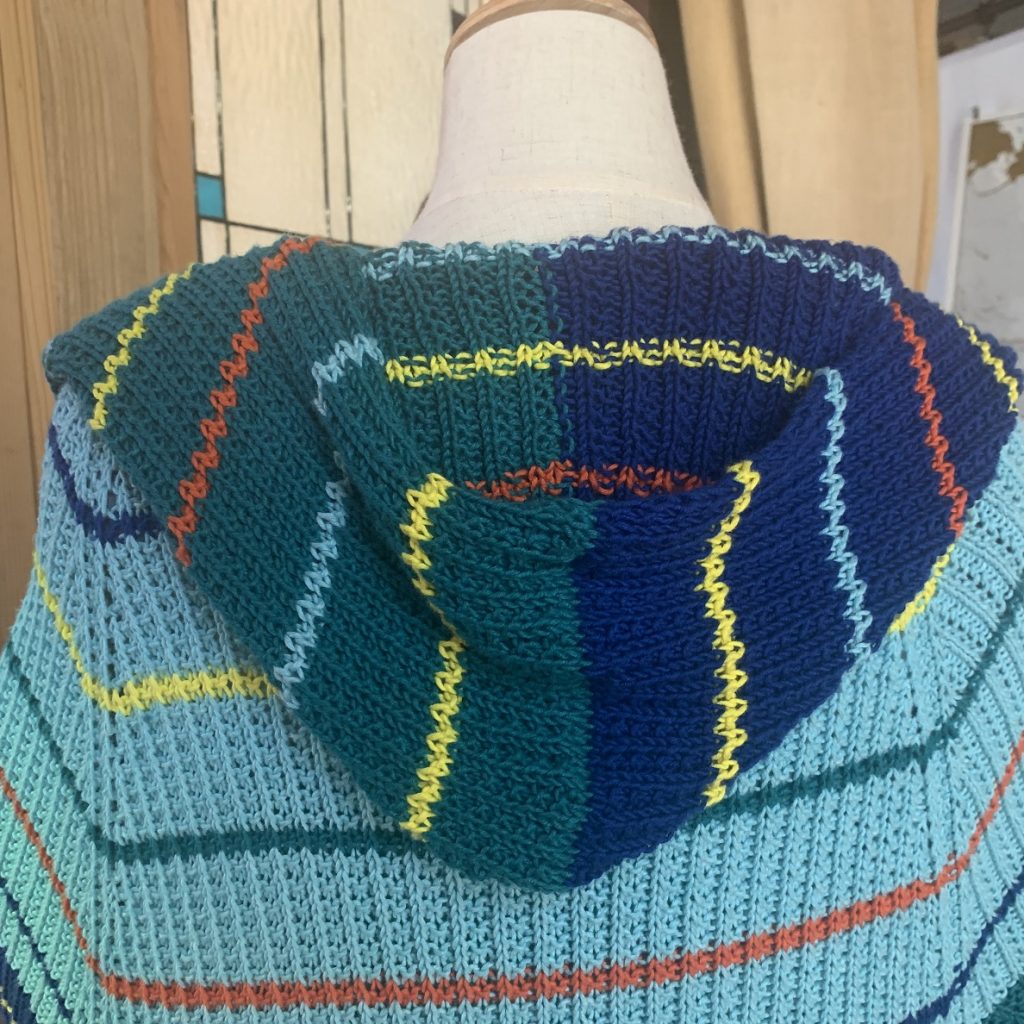
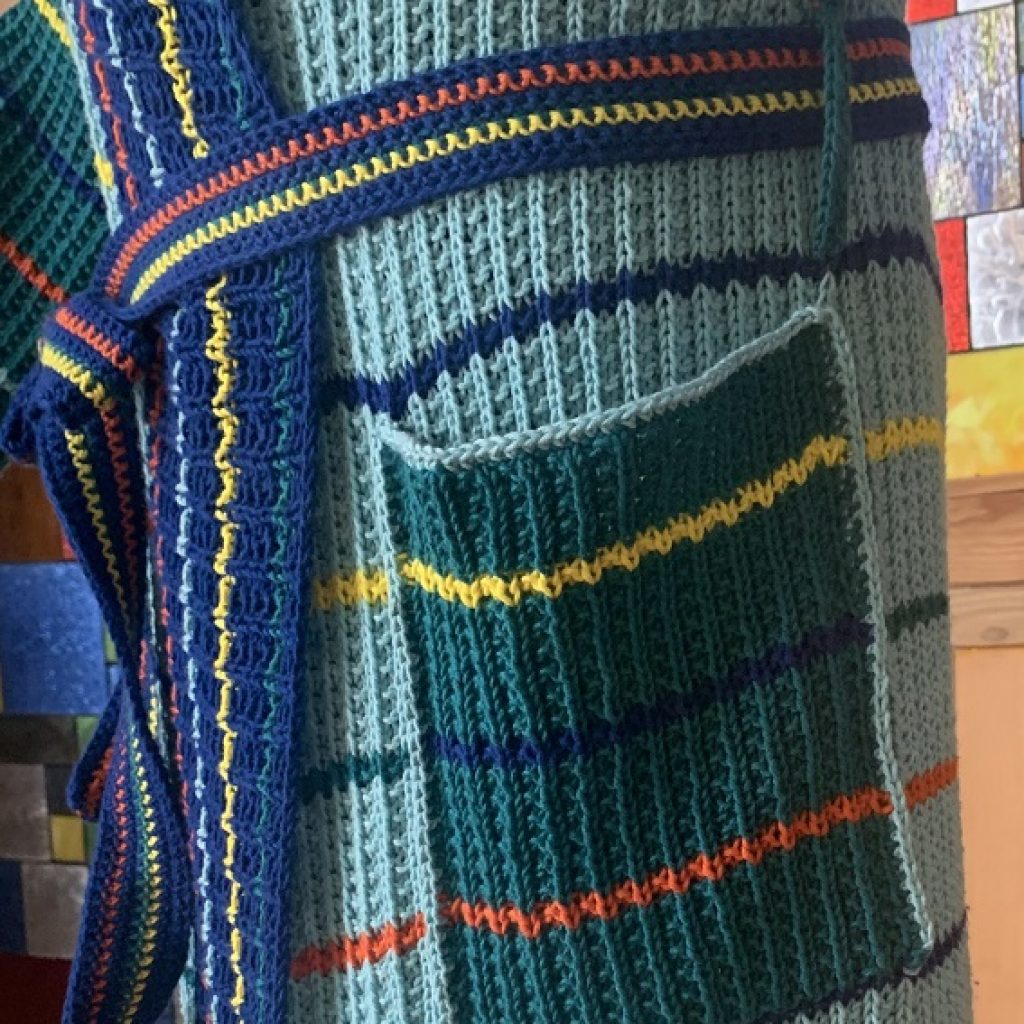
After a few rounds of wearing, so far this ones’ holing up on all ends. In the next post, I’ll be sharing a matching cami and wide leg pants.
Trying out various stitches
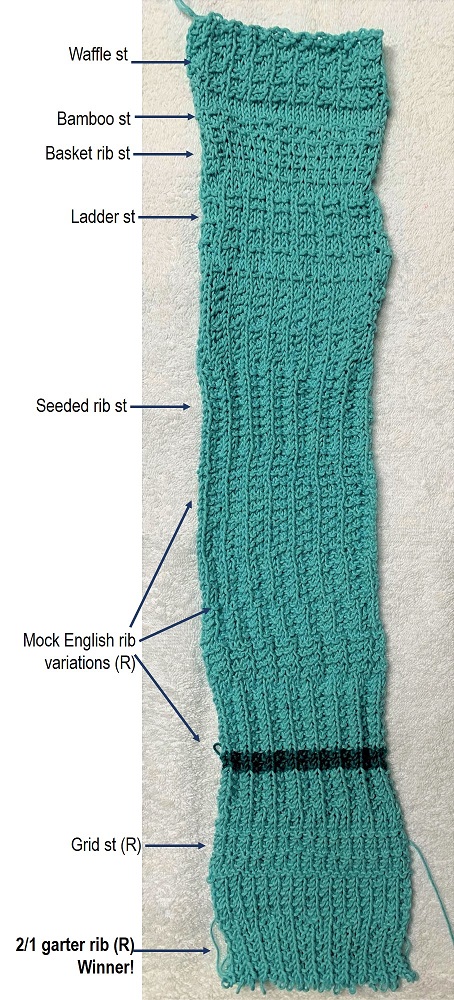
For a cushy and light texture that will also help dry out quicker, I tried out numerous stitch variations. Turned out the “waffle” knit stitch does not produce a waffle spa robe like texture. It’s not reversible, and I do not care for the “wrong” side texture. Then I came across the basket (rib) stitch, which mimics the waffle texture, but not reversible, either.
After trying many other varieties, most of which do not even show up on the picture on the right (including box st, honeycomb st, Edelweiss st, half brioche st, daisy st, etc.), I zoomed in on variations of mock English rib or garter rib sts with a different #s of knit and purl stitch combinations because they are relatively simple and reversible.
Because it is going to be a relatively large piece involving a raglan yoke knit in flat as well as sleeves knit in round, I wanted to make the repeat a relatively small # of sts while keeping a knit “vein” running on both sides. At the end, I opted for 2/1 knit/purl repeat. It’s exactly the same on both sides for knitting in flat and in round, k2/p1 is simply flipped to p2/k1. It’s fun to knit and comfy to wear and I am quite fond of it.
Deciding on the color and pattern
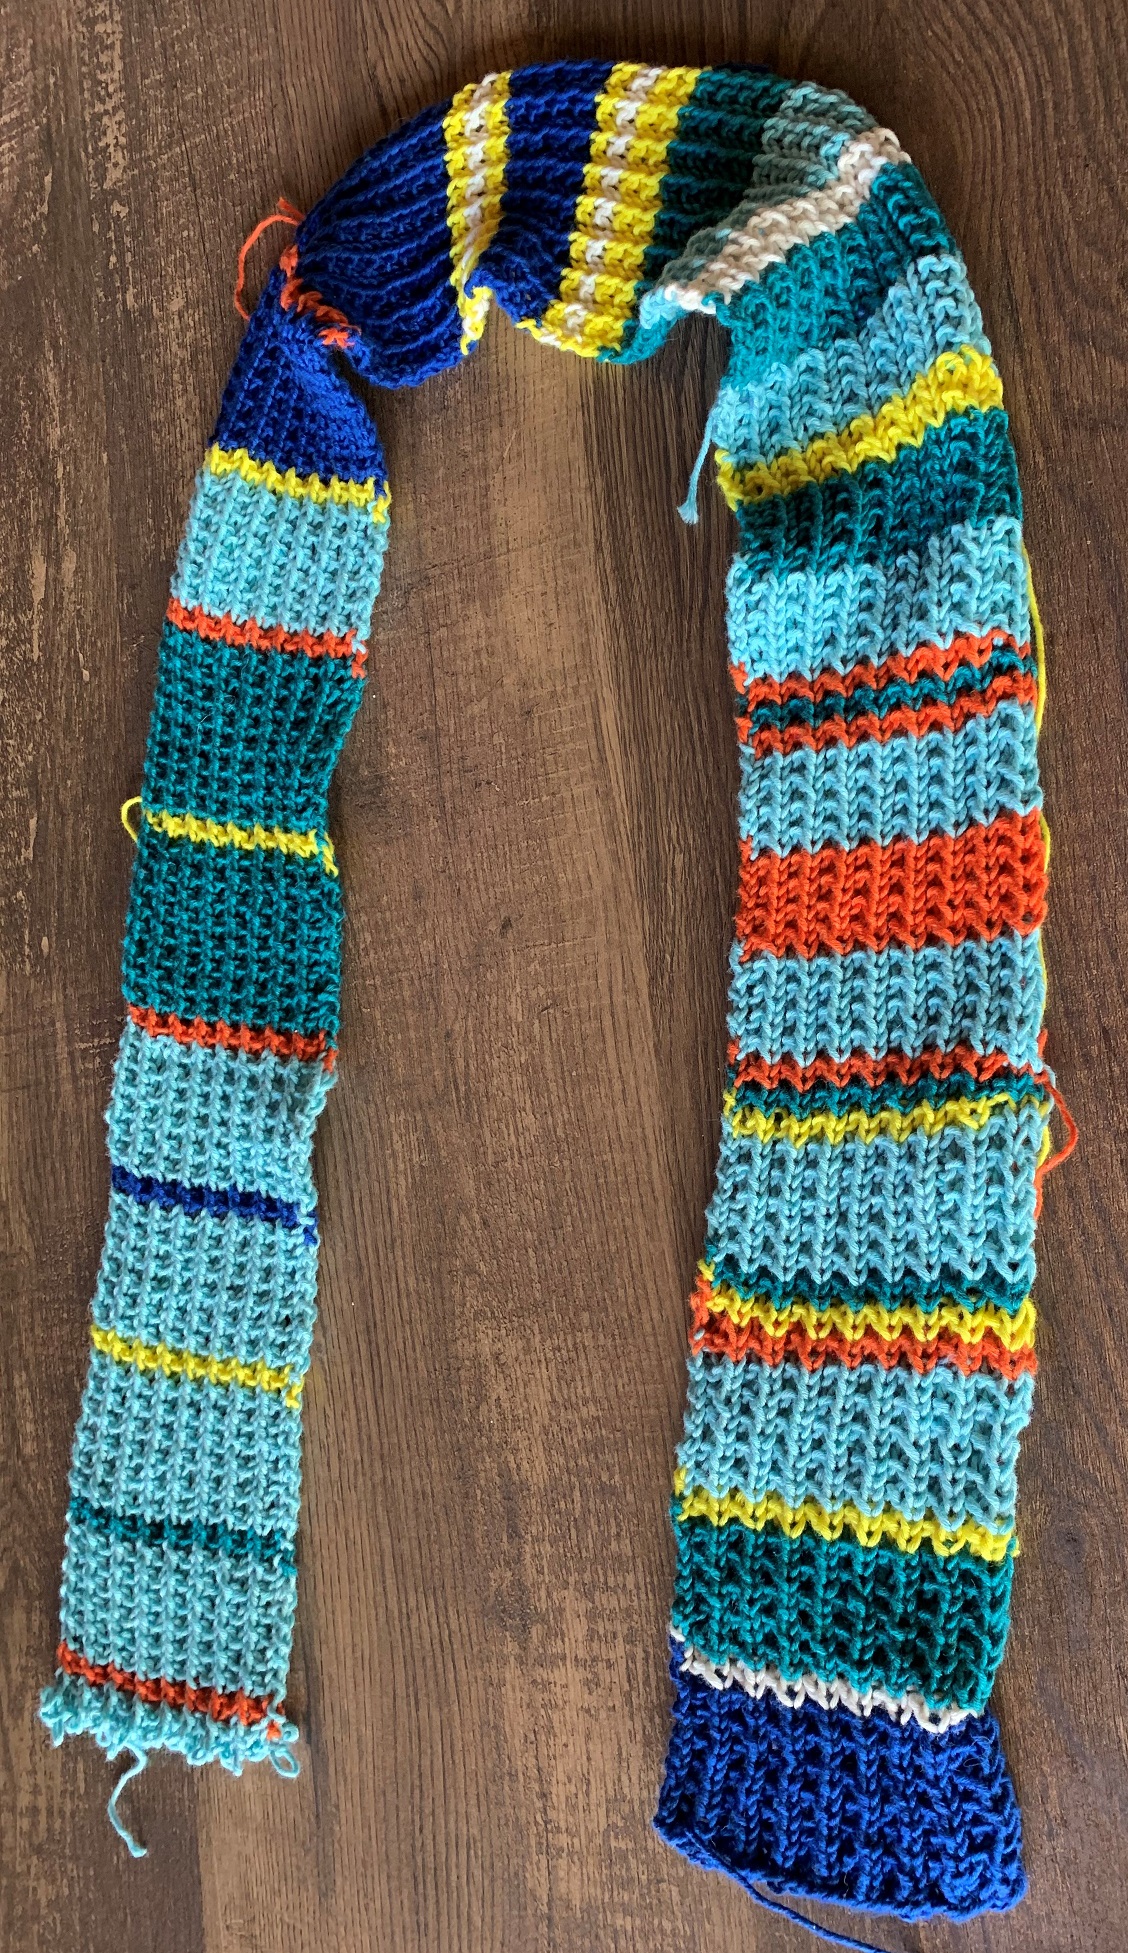
I had three main colors (light turquoise blue, teal, deep blue), two accent colors (yellow, orange), and white in Purl Soho’s Cotton Pure (100% organically grown cotton in sportweight), and wanted to mix & match them in stripe. Usually, I would roughly figure out the sequences by lining up skeins and start knitting (like in Accidental Stripe Blanket Poncho or Multi-Way Flowy Cardigan). This time, I wanted to be a bit more deliberate because a robe has many parts – right & left main body and openings/trims, sleeves, hood, pockets, belt and belt loops, and tie… So I decided create swatches with numerous combinations and sequences, and found out that the possibilities are literary endless! At the end, I settled on the 12-row/2-row stipes of main colors (different depending on parts) and accent colors. However, like a color on the wall, when you start painting, looks different from the one on a paint chip, I was prepared to unravel and start over if I didn’t like what I was seeing once I started knitting. Luckily, it worked out this time. So, it does pay out to take time and knit swatches if you are creating a new pattern.
A few little details make a difference in comfort
To live in it for a long time time, there are a few little details that could make a difference, if you want them. It will add on some time, so they are entirely optional.
Internal closure
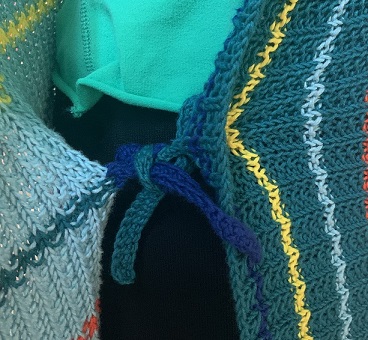
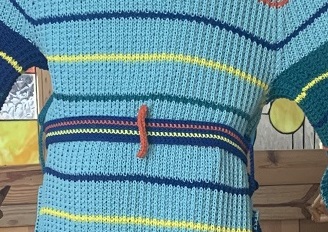
A soft and cushy robe means it could unravel to a sloppy flop as you move about. To prevent that from happening, you can add two strings to use as an internal closure, like this. Perhaps the easiest way is to knit out about an inch inward from one of the front edges and another from just above a waist line from another side. I used two rows of single crochet stitch, and you could use i-cord or whatever easy for you.
Light neckline synch
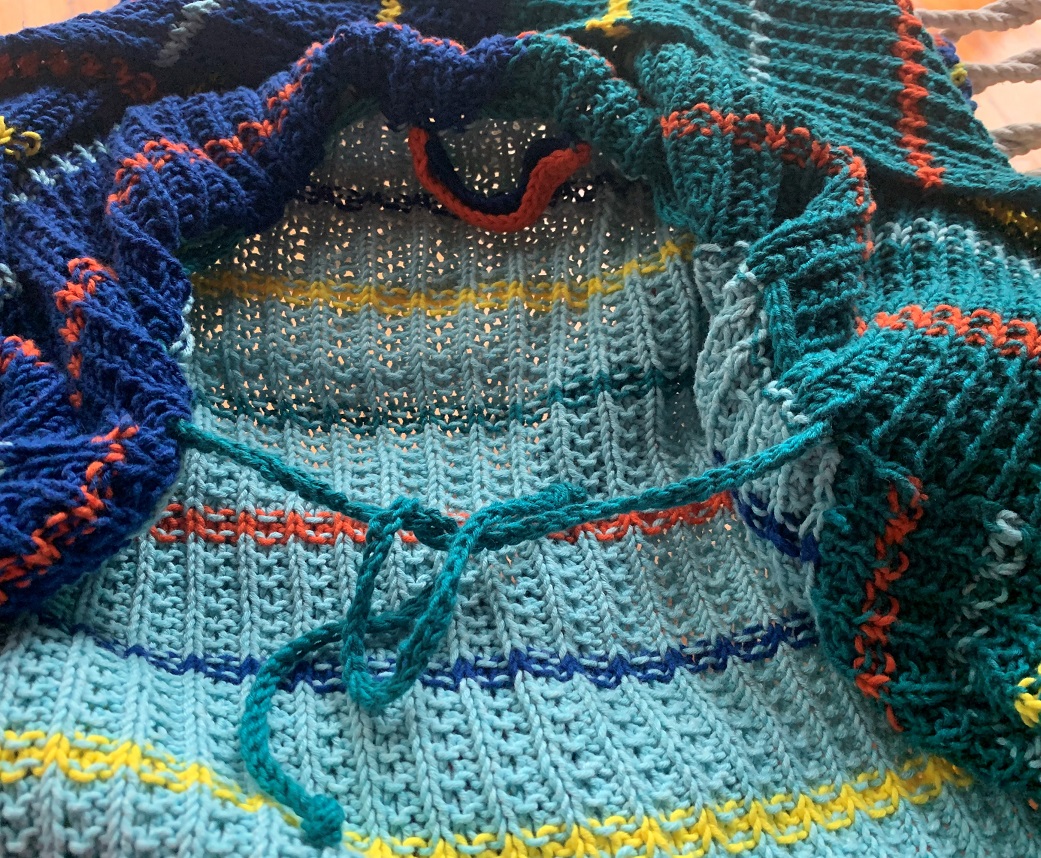
Because this neckline is deliberately kept soft and unstructured, it can get a bit slouchy as you wear it for a while. An easy solution is to knit a lightweight cord and thread through your neckline. I used a simple crochet cord by chain and pull stitches, thin enough so that it can gather/relax around the neckline as needed and long enough to tie it loosely.
Backside belt loop
If you are often annoyed by your belt having fallen off the side loops when you picked up the robe to wear, adding a back belt loop can help prevent it from happening. Here again, I used two rows of single crochet stitch.
Modest sized hood
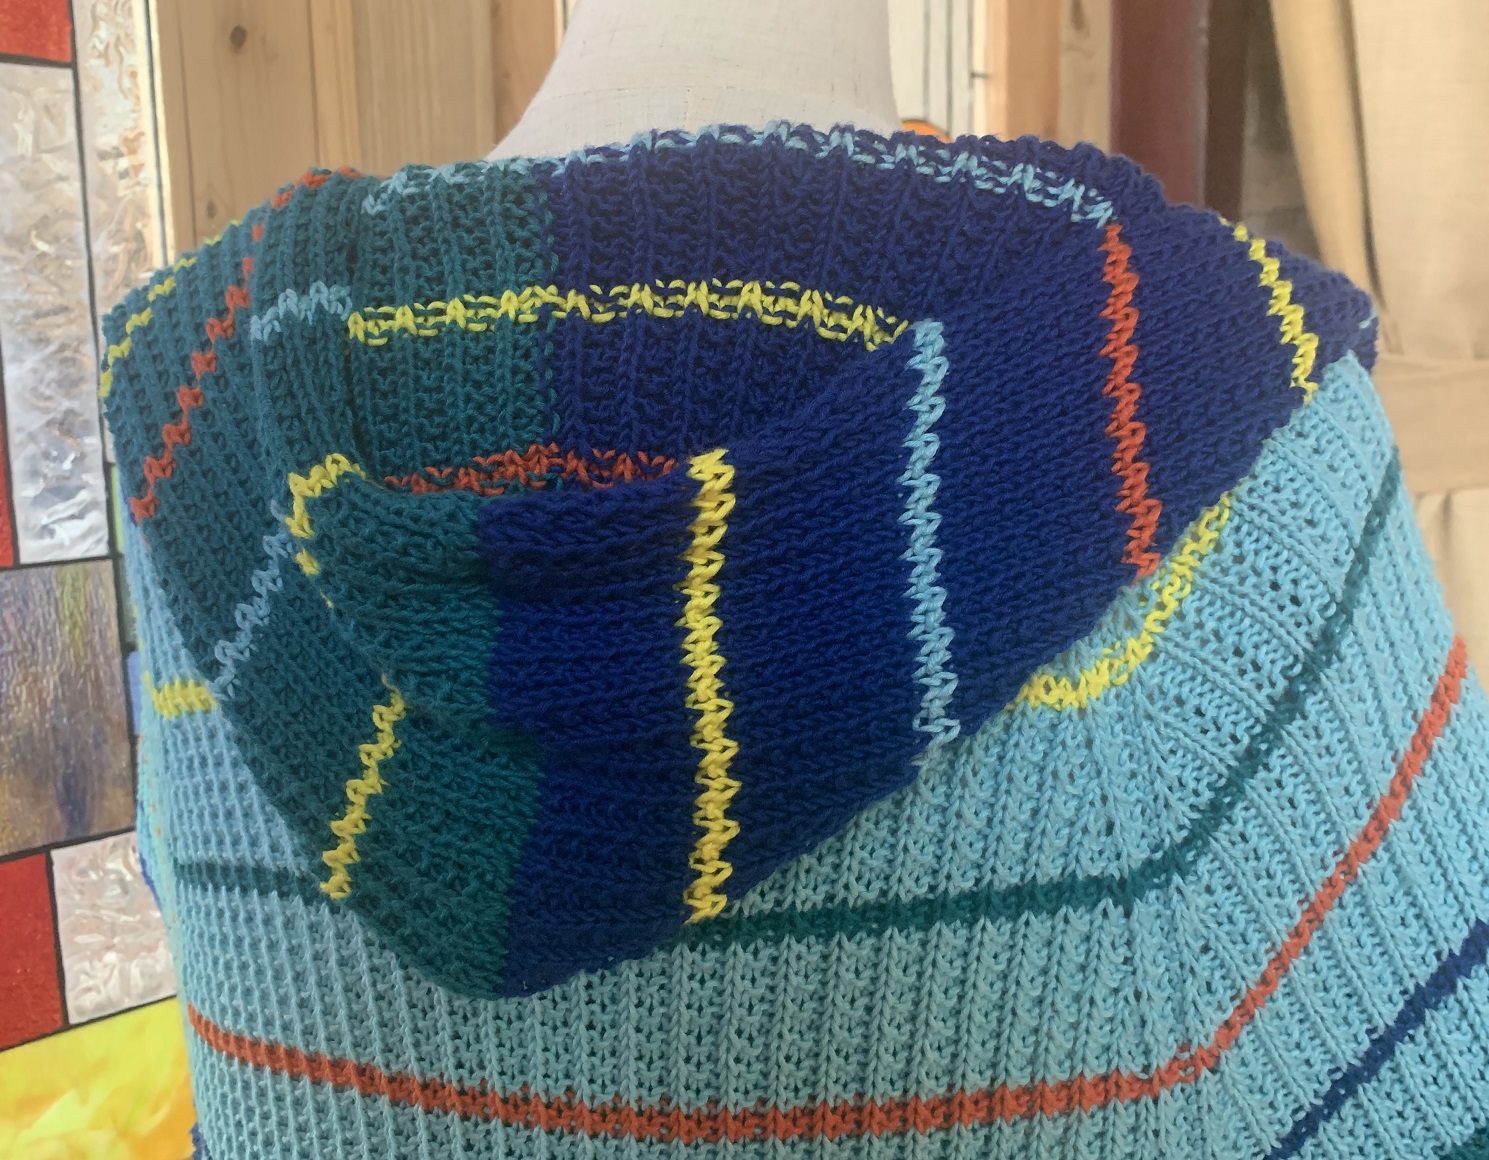
A hood is a wonderful comfort enhancer for a robe because it covers the back your neck from cold. It also covers wet hair nicely and prevents it from sticking to you neck line.
Because you are not battling wind or snow, the hood can be modest in size so that it won’t keep falling over your forehead and cover your eyes, which can be annoying.
Super easy to customize
While I went with a bit over-done combo of bright color stripes, this is easily customizable. You can use a simple two or three-tone stripes, or a single color you find soothing. Because it’s top-down, you can adjust the length as you please. It was a lot of work, but it’s just the way I like it and I enjoy living in it every day.
Knitting charts and instructions
Construction
- Yoke – knit flat top down in raglan from provisional cast-on.
- Body & sleeves – after separating them, continue to knit in pattern until they reach the desired lengths. If preferred, you can add a vent in the back body or on the sides.
- Front body bands – pick up stitches from front body edges and knit in pattern for 5″ and bind-off.
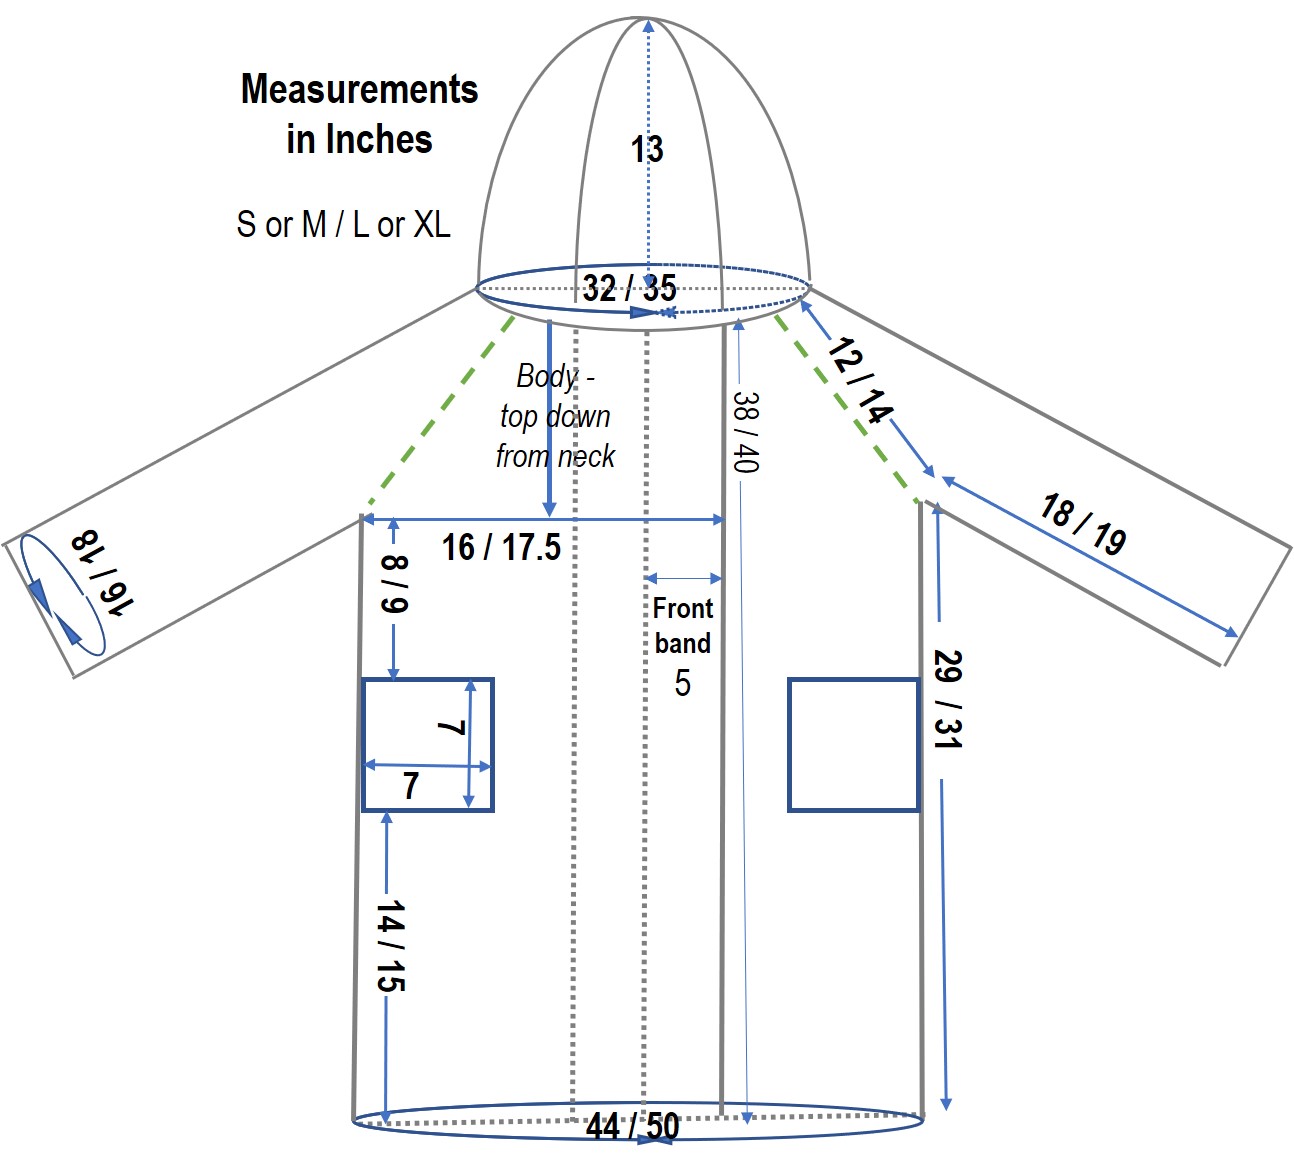
- Hood – unravel the provisional CO and pick-up stitches from the front bands. Knit flat in rectangular shape and sew the top.
- Pockets – pick up about 7″ (42 sts) from the bottom and knit up in pattern while sewing in every row as you knit. Trim with a crochet st.
- Belt – Crochet using single st and if desired, incorporate stripes.
- Side & back belt loops, back neckline hanging loop, internal closure cords, and synch cord – crochet sts.
| Yarn | Needle | Gauge (4”) | Size | Construction |
| For S/M or L/XL, approximately 4,000 or 5,000 yrds of sportweight yarn. This example in S/M uses 4 skeins each of Purl Soho Cotton Pure (100g/279 yrds) in Crystal Blue, Ultramarine Blue, and Peacock Teal + about ½-skein each of Tomato Orange, and Jonquil Yellow as accent colors for the stripe. | US #4 (3.5 mm) 36″ (for body) and 16” (for neck & arms) circular needle. I have a loose gage, so used #3. #7 crochet hook. | 22 sts x 26 rows in pattern stitch. | See the sizing chart. The robe is meant to be roomy and highly adjustable | Starting with provisional CO neckline, knit top-down flat in raglan until underarm. After joining, knit Body in flat until the desired length, pick up stitches from each front edge and knit in pattern st for about 5”. For Hood, pick up sts from front bands and CO neckline and knit vertically. Knit each Sleeve in round until it reaches desired length. |
| RS – right side WS – wrong side k – knit p – purl CO – cast on BO – bind off | m – stitch marker pm – place marker sm – slip marker | p2tog – purl 2 sts together SSK – slip, slip, knit SSP – slip, slip, purl | F – Front B – Back LF – Left Front RF – Right Front LS – Left Sleeve RS – Right Sleeve | M1L – make 1 left leaning stitch by knitting into a loop from the bar before the stitch you’re about to knit. M1R – make 1 right leaning stitch by knitting into a loop from the bar after the last stitch you knit. |
Pattern stitch – garter rib
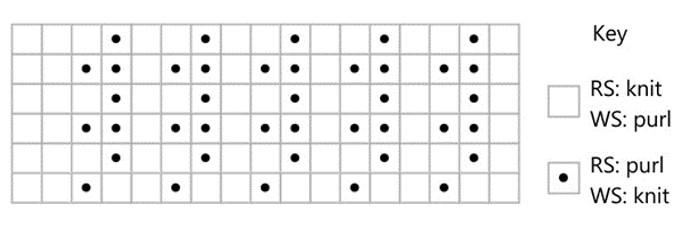
Garter ribs gives you a cushy, soft, and reversible fabric that lets the air through and absorbs moisture, which is perfect for a robe like this. There are many varieties, and here I used a simple 3-st repeat of k, k, p. In flat, it’s the same on every row. In round, every 2nd row is k, p, p.
Neckline
- Using circular needle, provisional CO 108 / 126 sts with your favorite method. My go-to method is using a waste yarn and a crochet hook as explained in this Very Pink Knits post.
- Starting point is the Left Front (LF) edge and the ending point is the Right Front (RF) edge.
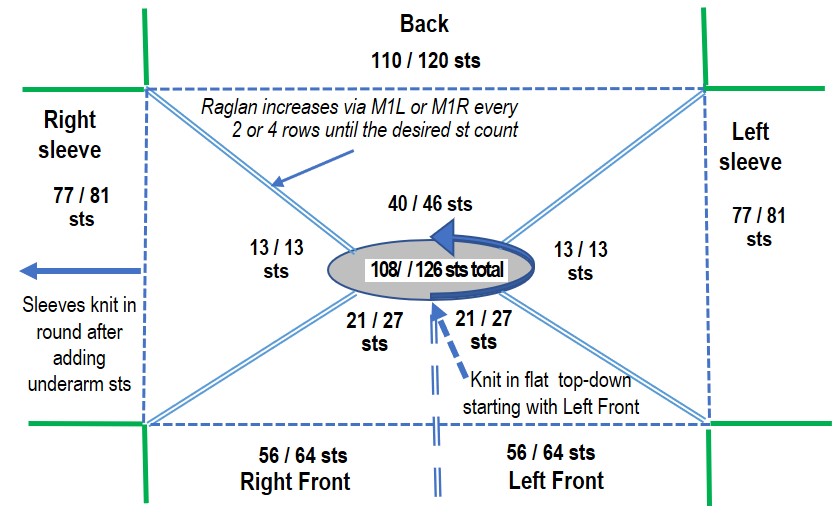
Start raglan yoke shaping
This raglan seem pattern includes a 2-st garter ridge between two raglan seams, and continues until the raglan yoke reaches the desired lengths. You can choose to knit the last several rows without raglan increases if you are concerned about body or sleeve getting too wide.
Raglan marker set-up
- R1 (WS) – Purl one row all around starting with RF edge. p1 (RF edge) + p18 / p24 + p2 (RF raglan), pm, p2 (RSF raglan) + p9 + p2 (RSB raglan), pm, p2 (RB raglan) + p36 / p42 + p2 (LB raglan), pm, p2 (LSB raglan) + p9 + p2 (LSF raglan), pm, p2 (LF raglan) + p18 / p24 + p1 (LF edge)
- R2 (and every RS) – Start garter rib. LF [k1 + *k1,k1,p1* until 2 sts before m, M1R, k1,k1] sm, LS [p1,k1, M1L + *k1,k1,p1* until 2 sts before m, M1R, k1,k1] sm, Back [p1,k1, M1L + *k1,k1,p1* until 2 sts before m, M1R, k1,k1] sm, RS [p1,k1, M1L + *k1,k1,p1* until 2 sts before m, M1R, k1,k1] sm, RF [p1,k1, M1L + *k1,k1,p1* until 1 st before the edge, k1]
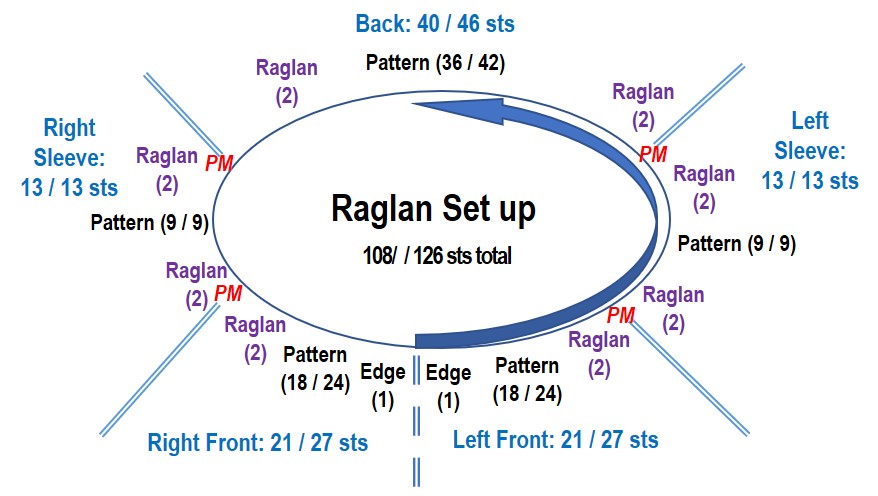
- R3 (and every WS) RF [p1 + *k1,k1,p1* until 2 sts before m, p1,p1] sm, RS [k1,p1 + *k1,k1,p1* until 2 sts before m, p1,p1] sm, Back [k1,p1 + *k1,k1,p1* until 2 sts before m, p1,p1] sm, LS [k1,p1 + *k1,k1,p1* until 2 sts before m, p1,p1] sm, LF [k1,p1 + *k1,k1,p1* until 1 st before the edge, p1]
- Continue to knit as set up until the raglan seam reaches the desired lengths (between around 12” – 14”).
- In this example, repeat raglan increases 26 times every RS, then 9 more times every 2nd RS (i.e., every 4th row). For sleeves, depending on how roomy you want them, you can stop after 6 more times and knit the rest without increases.
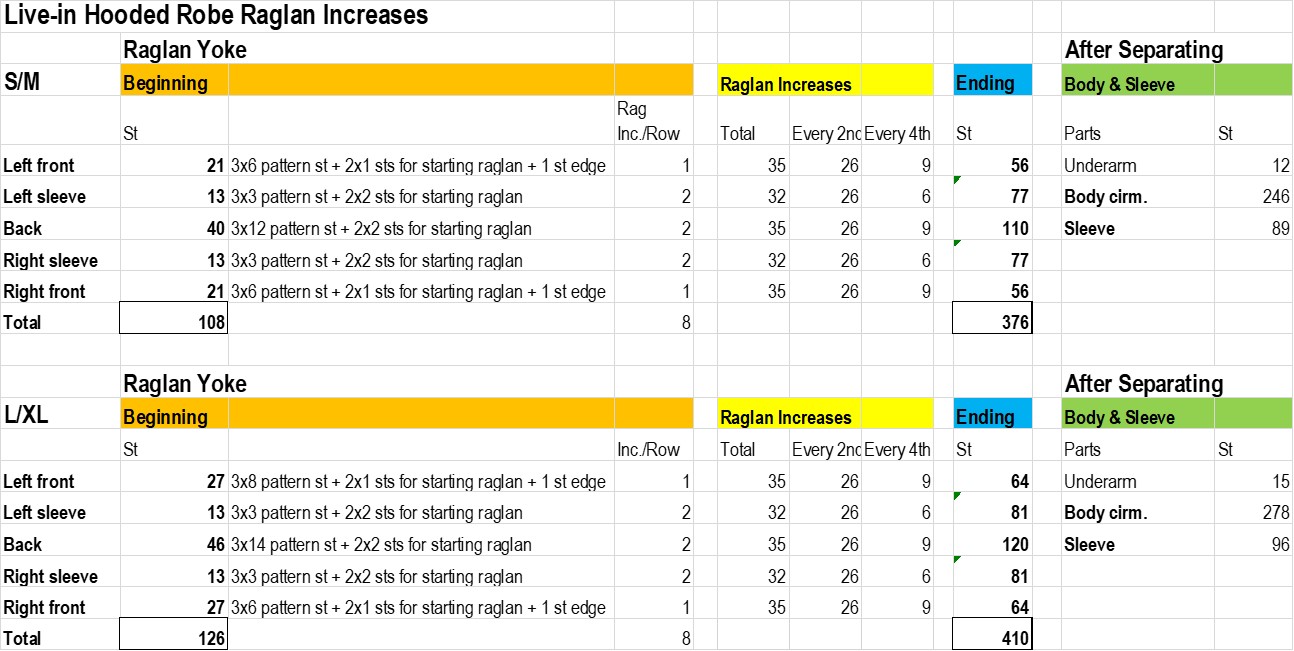
Separate sleeves from the body
You are ready to separate body and sleeves by holding sleeves in stitch holders or waste yarns, and adding underarm sts.
- Underarm sts:
- Recommended # of sts is 12 / 15 (x4 / x5 pattern repeats), and you can make adjustments based on the preferred ease for sleeves.
- Backwards loop CO is used here, and please feel free use your preferred method.
- First round (RS) – From LF edge, work in pattern to m, remove m, CO 10 / 13 sts; transfer LS sts to stitch holder or waster yarn; continue to work in pattern to m before RS, remove m, CO 10 / 13; transfer RS sts to stitch holder or waster yarn; remove m, continue to work in pattern to RF edge.
Body
- Continue to knit Body in flat in Pattern as established while adding pattern stitches for underarms.
- 2nd round (WS)
- To avoid “holes” for the raglan underarm, you will be adding M1 at the beginning and the end of each underarm CO, making the total # of underarm sts to 12 / 15.
- Starting with the RF edge, continue with Pattern as established until the beginning of 1st underarm CO, M1, continue with Pattern repeat until the end of CO, M1, continue to work Back to 2nd underarm CO, M1, continue until the end of CO, M1, continue to work in Pattern until the LF edge.
- 3rd round and onward – continue to work body until it reaches the desired length. You can add side or center slits for further ease of movements.
- Loosely BO.
Sleeves
- Continue to knit each Sleeve in round in Pattern as established while adding pattern stitches for underarms.
- Pattern sts repeats for round:
- R1 – k1,k1,p1
- R2 – k1,p1,p1
- Picking up underarm sts – to avoid “holes” for the raglan underarm, you will be adding M1 at the beginning and the end of each underarm CO, making the total # of underarm sts to 12 / 15.
- Pick up underarm sts and continue with Pattern as established in round.
- Continue to work in Pattern until it reaches the desired length and loosely BO.
- Optional edge – fir a tighter sleeve edge, convert 3-st repeat to 1×1 rib, i.e.:
- Last row in pattern – k1,p1,p1
- First row in 1×1 rib – repeat *k1,p2tog1*
- BO loosely
Front Body Bands
You will be picking up stitches from LF/RF edges and work in Pattern horizontally. Typically, the best ratio is 3 sts per 4 rows. Continue with Pattern for about 32 rows until the band reaches 5”. BO very loosely.
Hood
You will be picking up stitches provisional CO and front body bands and work in Pattern vertically and sewing the top.
- Starting point: Once the front bands are complete, pick up sts from RF band (again, about 3 sts per 4 rows), then unravel provisional CO and knit, and continue on to pick up sts from LF band.
- Work in pattern (add one extra knit stitch for either edge) until it reaches around 13”
- Flip the hood while the sts are still live, fold in half and sew the top.


Leave A Comment