Lithe and Light Easy Raglan Tunic Dress
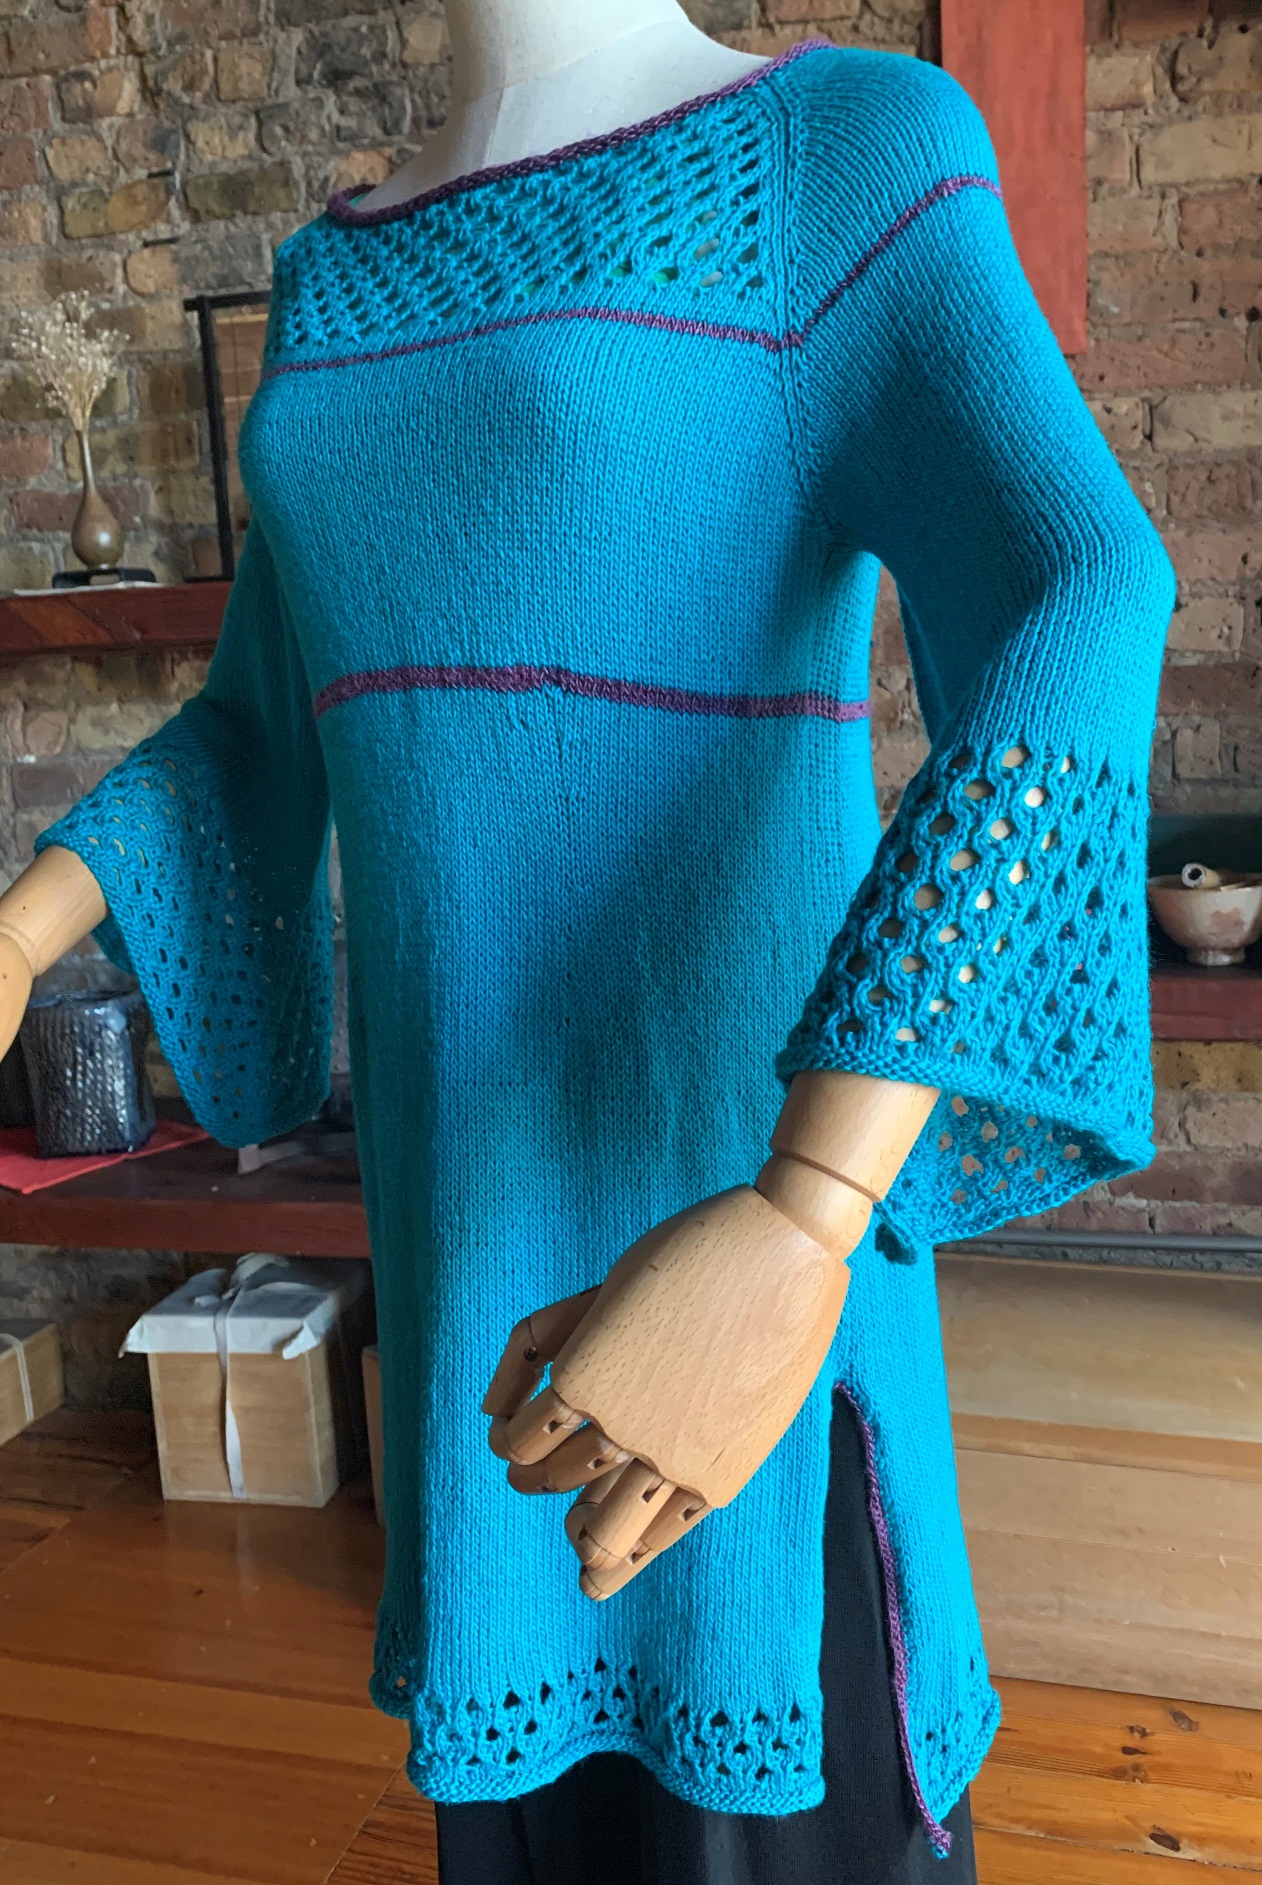
Light and sinewy tenderness
As the spring approaches, I wanted to make something bright and supple for in-between season that is also durable and wrinkle-free. This easy tunic dress with lace details is perfect to throw on in spring, summer, or early fall, when you want something light as a layering piece or a cover up. Knit with bamboo rayon that’s strong and wash-friendly, it drapes with a subtle shine. You can use silk or cotton, of course. However, a bamboo rayon gives you an option that is not only strong & durable, but also a fabric that gently caresses your skin with tender delights every time you move.
Working with a sport weight, supple bamboo rayon
Being a rather impatient knitter, up to this project, I had stayed away from lightweight yarns, mostly sticking with DK or worsted. For a piece for spring & summer (that’s not 100% lace like the hooded lace tunic), I had to bite the bullet and go with a lighter weight yarn. It turned out to be not as painful as I thought. The yarn I used, Burnish from Purl Soho, is a fingering to sport weight bamboo rayon with suggested needle size of US3-5. It’s durable, and with enough give, is fun to knit and easy to handle. It has a slight tendency to split if you are not careful, though.
Construction and easy knitting pattern
As usual, I started this with a top-down raglan construction with provisional CO for maximum flexibility so that I can decide on the details on neckline, sleeve shape/length, and body length as I knit along. This construction is particularly beneficial if you like trying it on as you knit and make adjustments.
I owe the starting pattern to Ayako Monier’s beautiful Pink Onyx. The original piece (short-sleeve sweater) incorporates an easy and graceful lace pattern for the upper portion of the bodice. The lace part on the bodice for this piece ends higher on the bodice so that you could wear it without a tank/camisole underneath. For a breezy feel, this piece repeats the lace pattern at the lower 1/3 of the sleeves and at the bottom hem of the tunic. The sleeves ended up in a trumpet shape because the lace pattern looks better if you can stagger them by adding two stitches per 4-row repeats, as you naturally do for the raglan yoke.
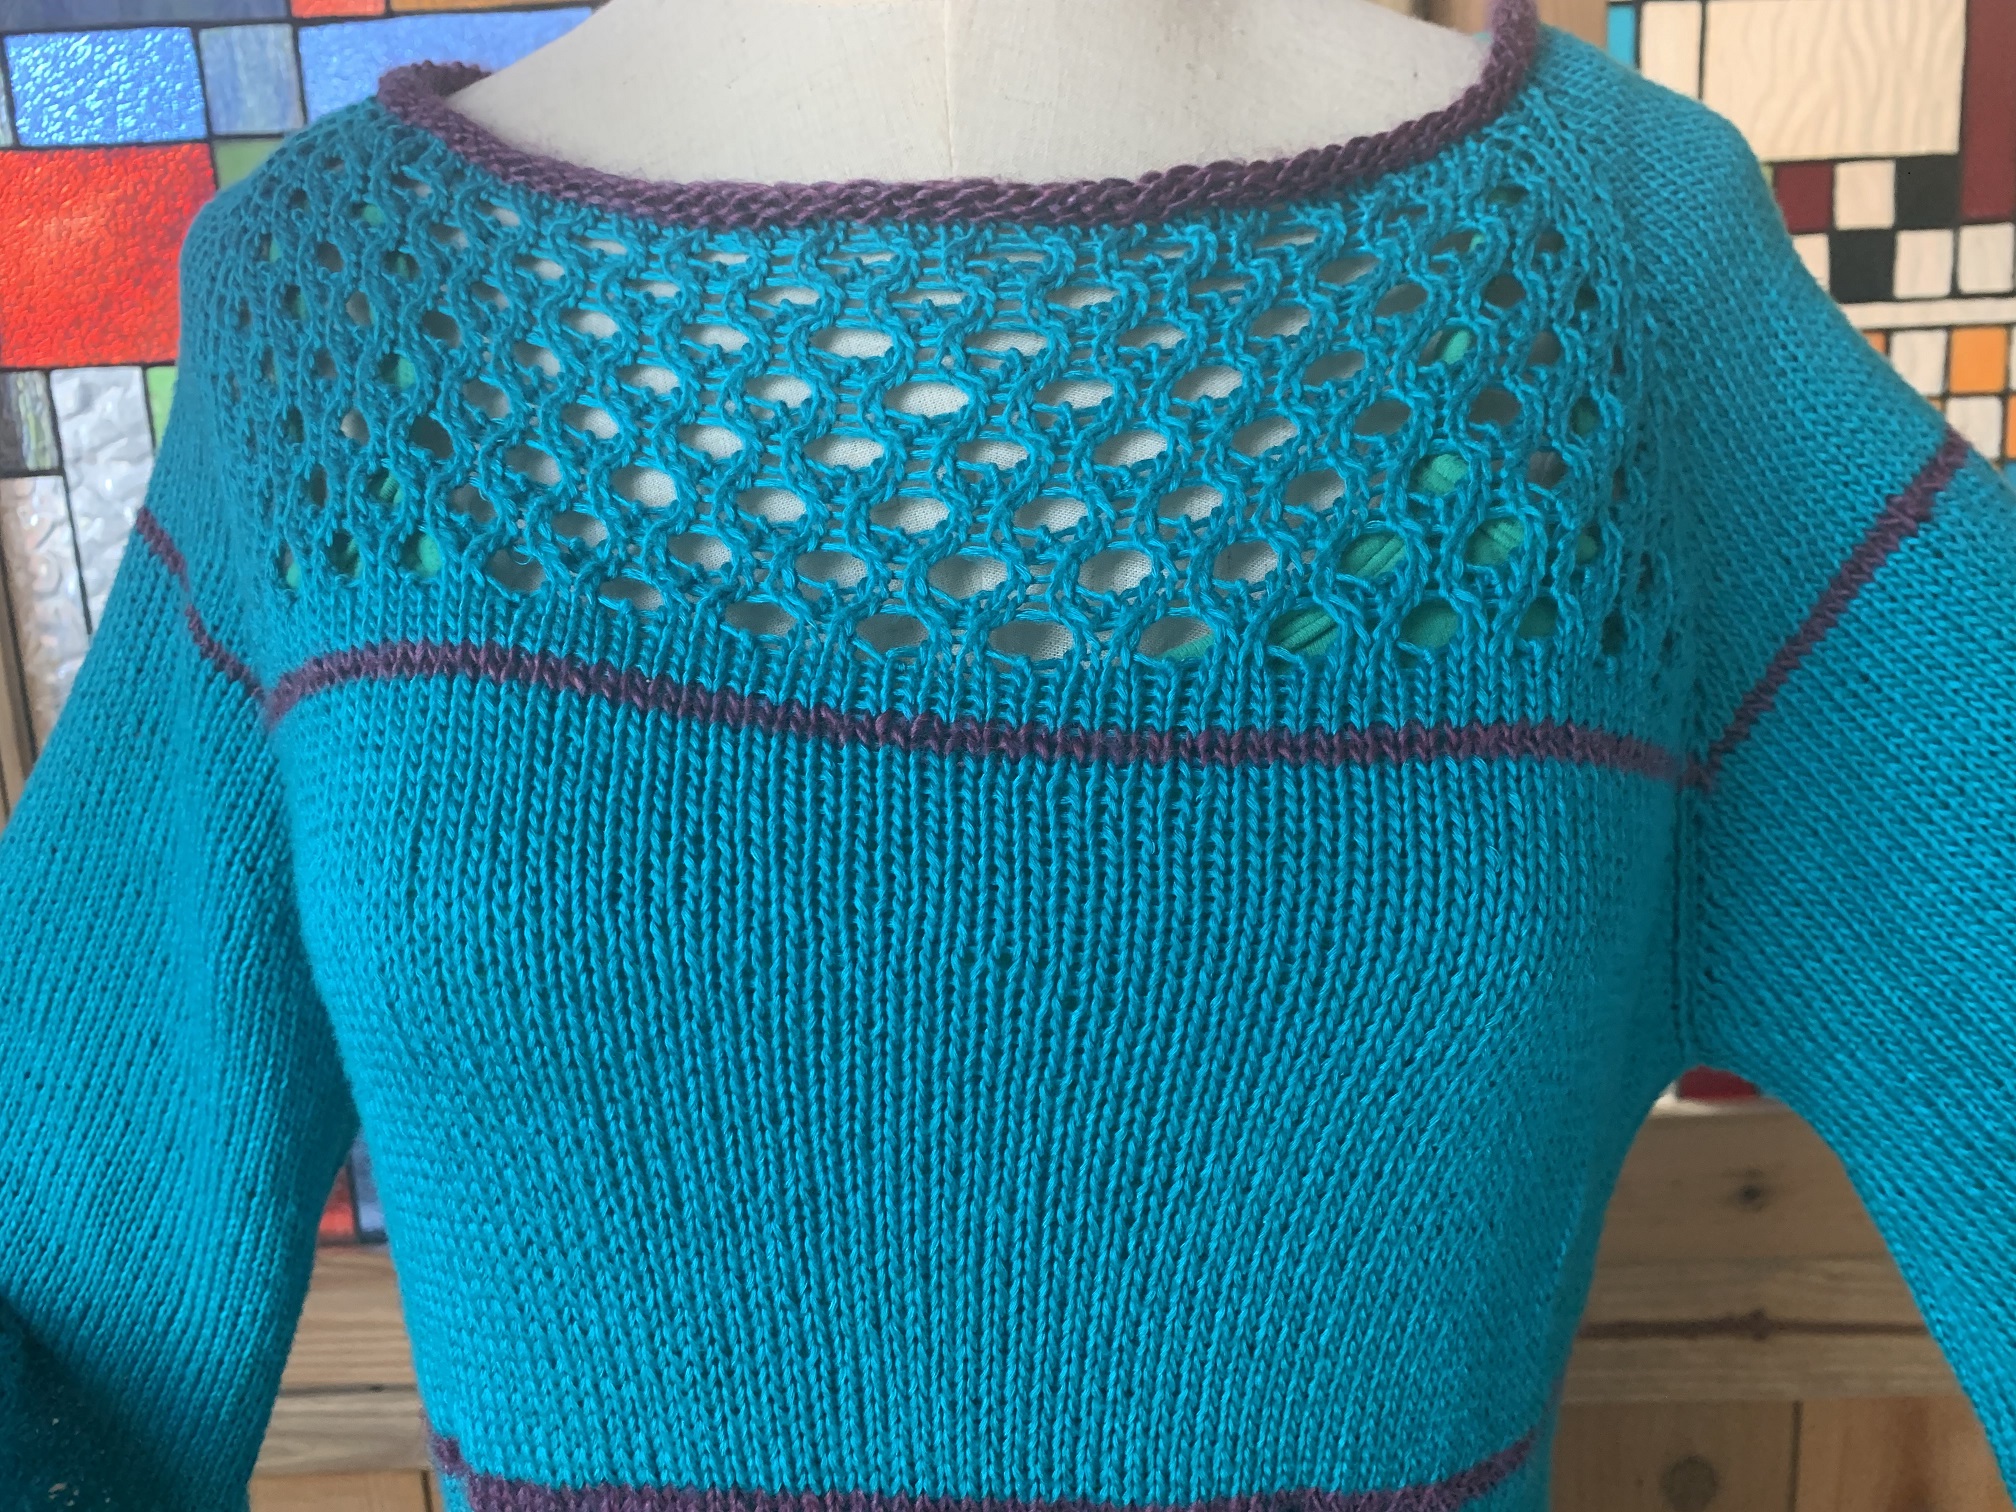
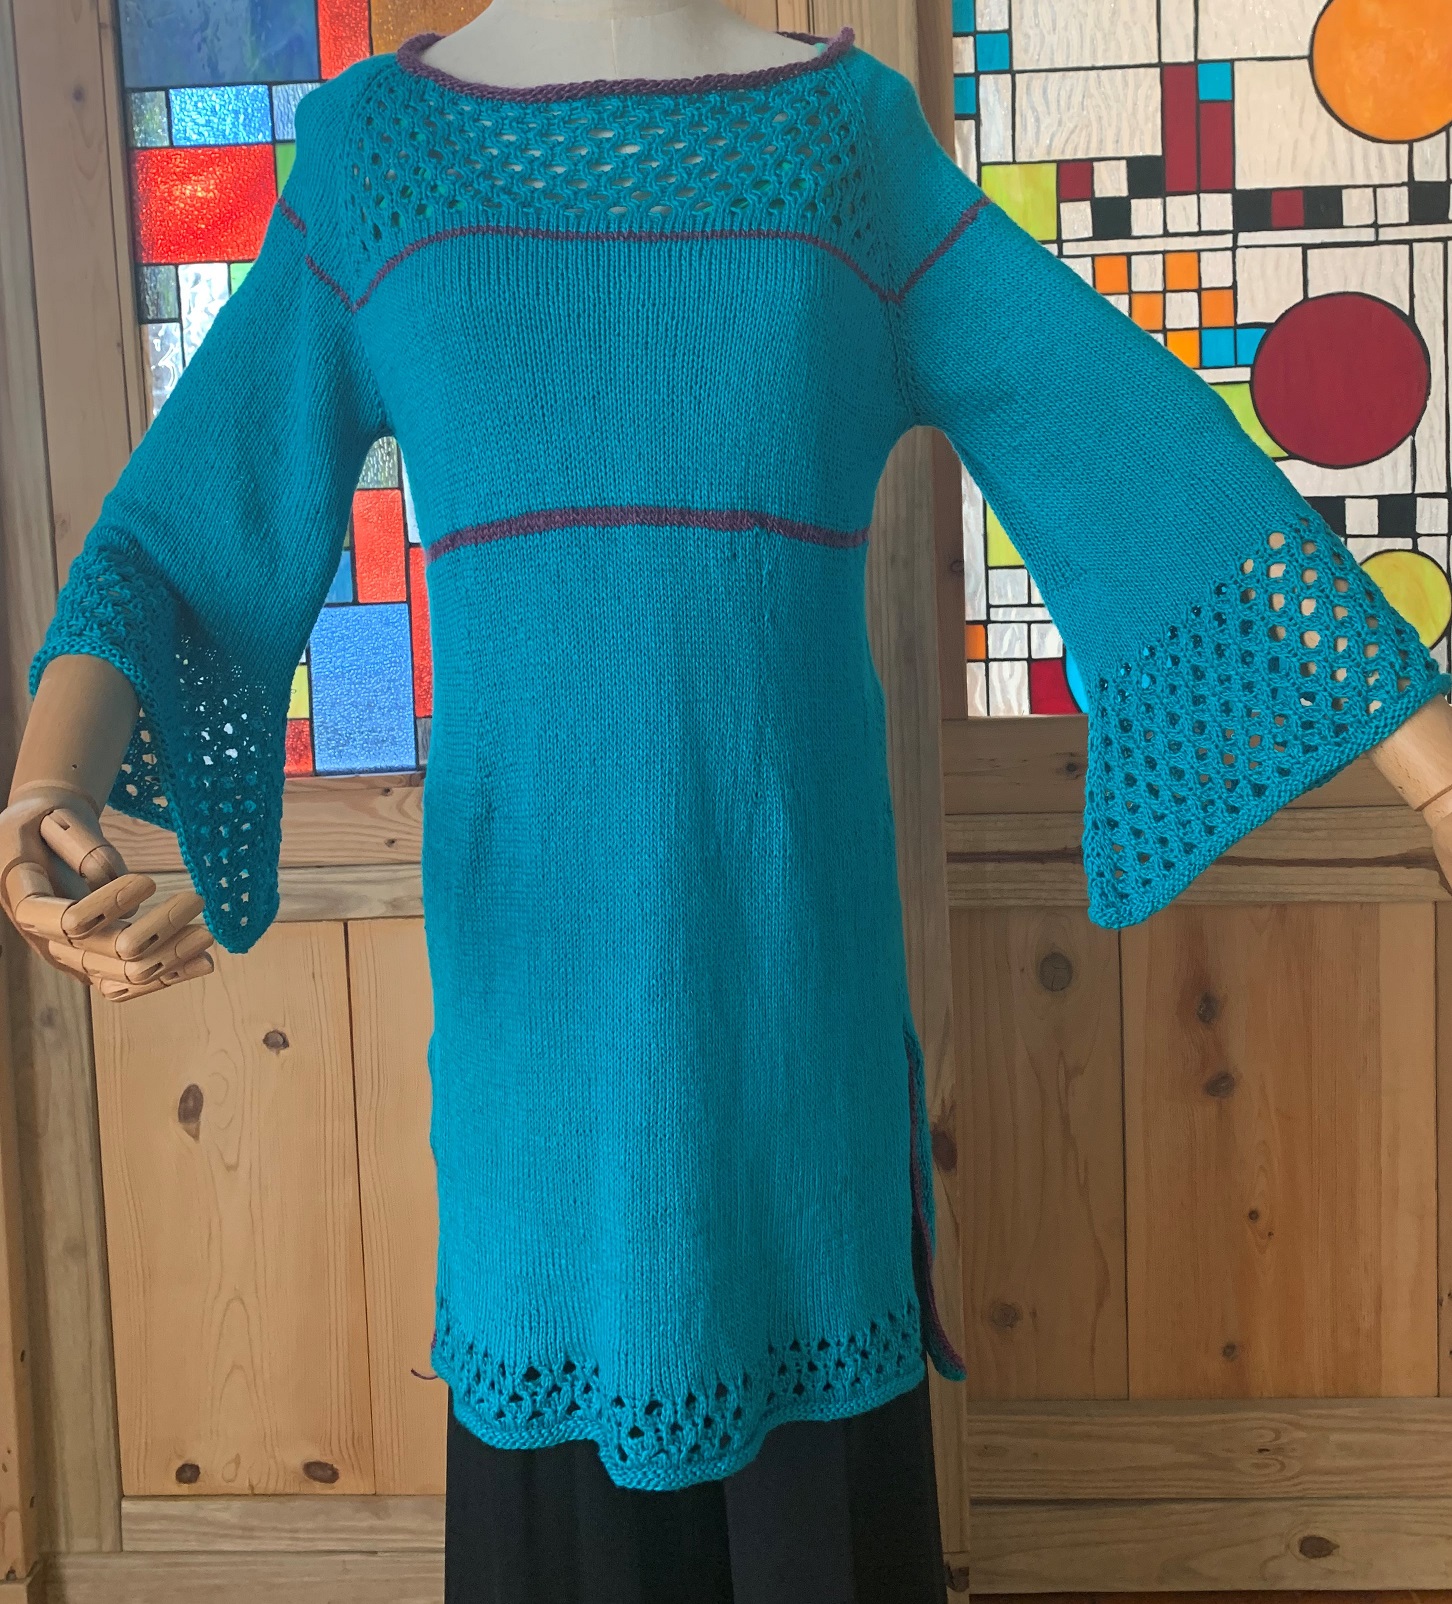
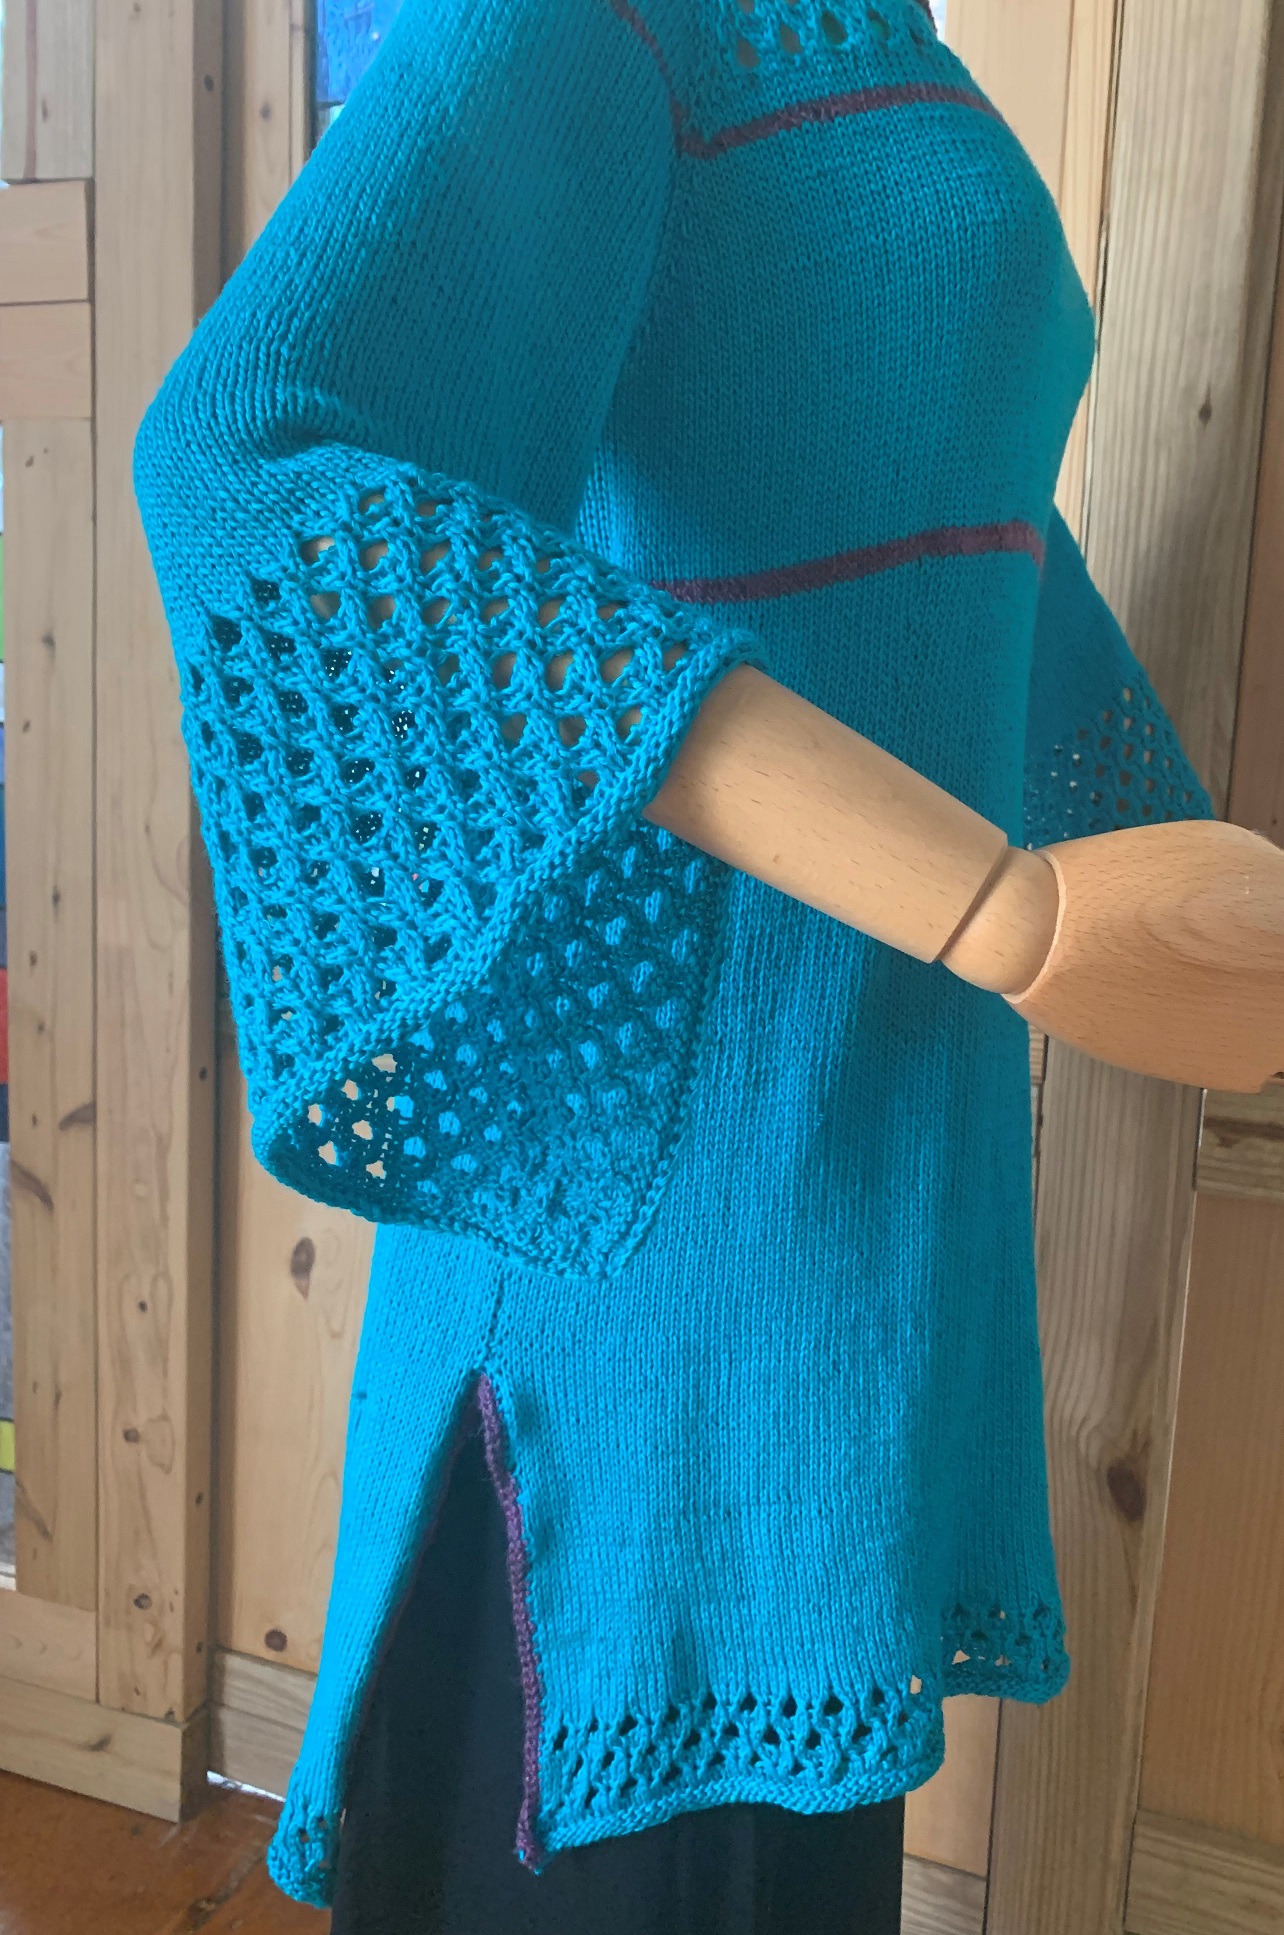
For the side slits on the lower body, you would switch from round to flat knitting by splitting front & back body. These details are completely up to you and it’s very easy to adjust. For this, I actually made a mistake of initially making the slits too deep, and after trying it on, ended up sewing up several inches of side slits.
I also had a small amount of another yarn in about the same weight in a contrasting color, so I used it sparingly on the neckline, bodice, and trims of the side slits.
I hope you can adapt this piece to a design you like as you knit along and create your lightweight tunic!
Knitting charts and Instructions
| Yarn | Needle | Gauge (4”) | Size | Construction |
| For S / M / L /XL, approximately 1,350 / 1,500 / 1,700 / 1,900 yrds of sportweight yarn. This example in small uses 4 skeins of Purl Soho Burnish (100g/339 yrds) in Turquoise Sea. | US #4 (3.5 mm) 36″ (for body) and 16” (for neck & arms) circular needle. I have a loose gage, so used #3. #7 crochet hook. | 22 sts x 26 rows in lace pattern or stockinette stitch. | See the sizing chart. Highly adjustable. | Yoke – knit in raglan with provisional CO. Body – knit in round until the start of side slits. Sleeve – knit in round |

Abbreviations
k – knit; p – purl
CO – cast on; BO – bind off
M – stitch marker; PM – place marker; SM – slip marker; EM – end marker
RS – “right” side; WS – “wrong” side
k2tog – knit 2 sts together
ssk – slip, slip, knit
ssp – slip, slip, purl
M1L – male 1 left leaning stitch by knitting into a loop from the bar before the stitch you’re about to knit.
M1R – make 1 right leaning stitch by knitting into a loop from the bar after the last stitch you knit.
Neck opening
- Using circular needle, provisional CO 104 / 104 / 128 / 128 sts with your favorite method. My go-to method is using a waste yarn and a crochet hook as explained in this Very Pink Knits post.
- Place EM (center of back body), and join for working in the round, starting from the right back yoke.
Start raglan yoke shaping
This raglan seem pattern includes a purl ridge between two raglan seams, as part of sts for front/back body.
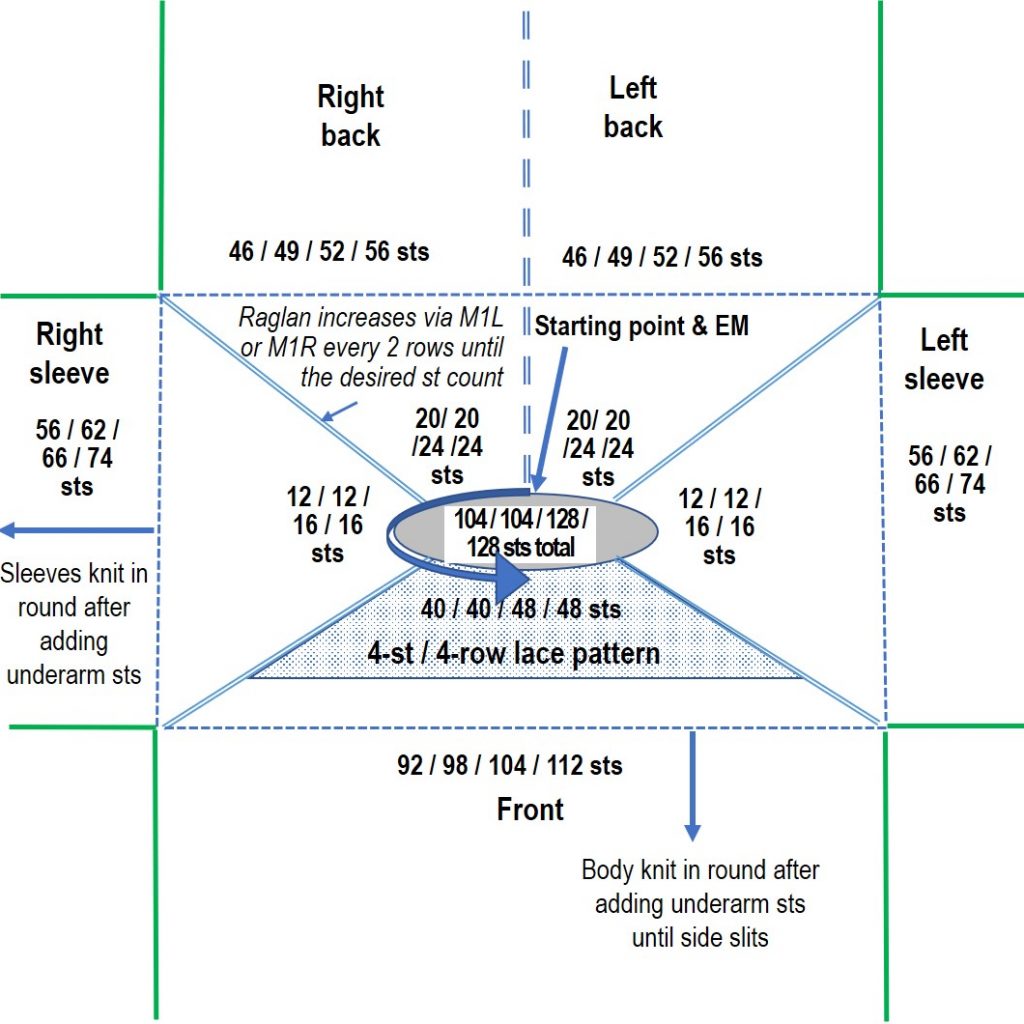
Raglan marker set-up
- K19 +p1 (S/M) / k23 +p1 (L/XL) (right back yoke), PM2, k12 (S/M) / k16 (L/XL) (right sleeve), PM1, p1 + k38 + p1 (S/M) / p1 + k46 + p1 (L/XL) (front body), PM4, k12 (S/M) / k16 (L/XL) (left sleeve), PM3, p1 +k19 (S/M) / p1 + k23 (L/XL) (left back yoke)) to EM.
- Knit / purl as set up for 1 round.
Raglan increase and short rows (to raise the back neck, see the short row chart)
- You will be adding stitch markers (M1-4) and raglan increases via M1R/M1L while working on short rows to raise the back neck.
- This one uses YO short row method, and you can use your favorite method, such as Wrap & Turn, German Short Rows, and Japanese Short Rows.
- Short row SR1 RS – starting the middle of back body (EM), knit to 2 sts before M2, M1R, k1, p1, SM2, k1, M1L; knit to 1 st before M1, M1R, k1, SM1; p1, k1, M1L, k2, turn. 4 sts increase.
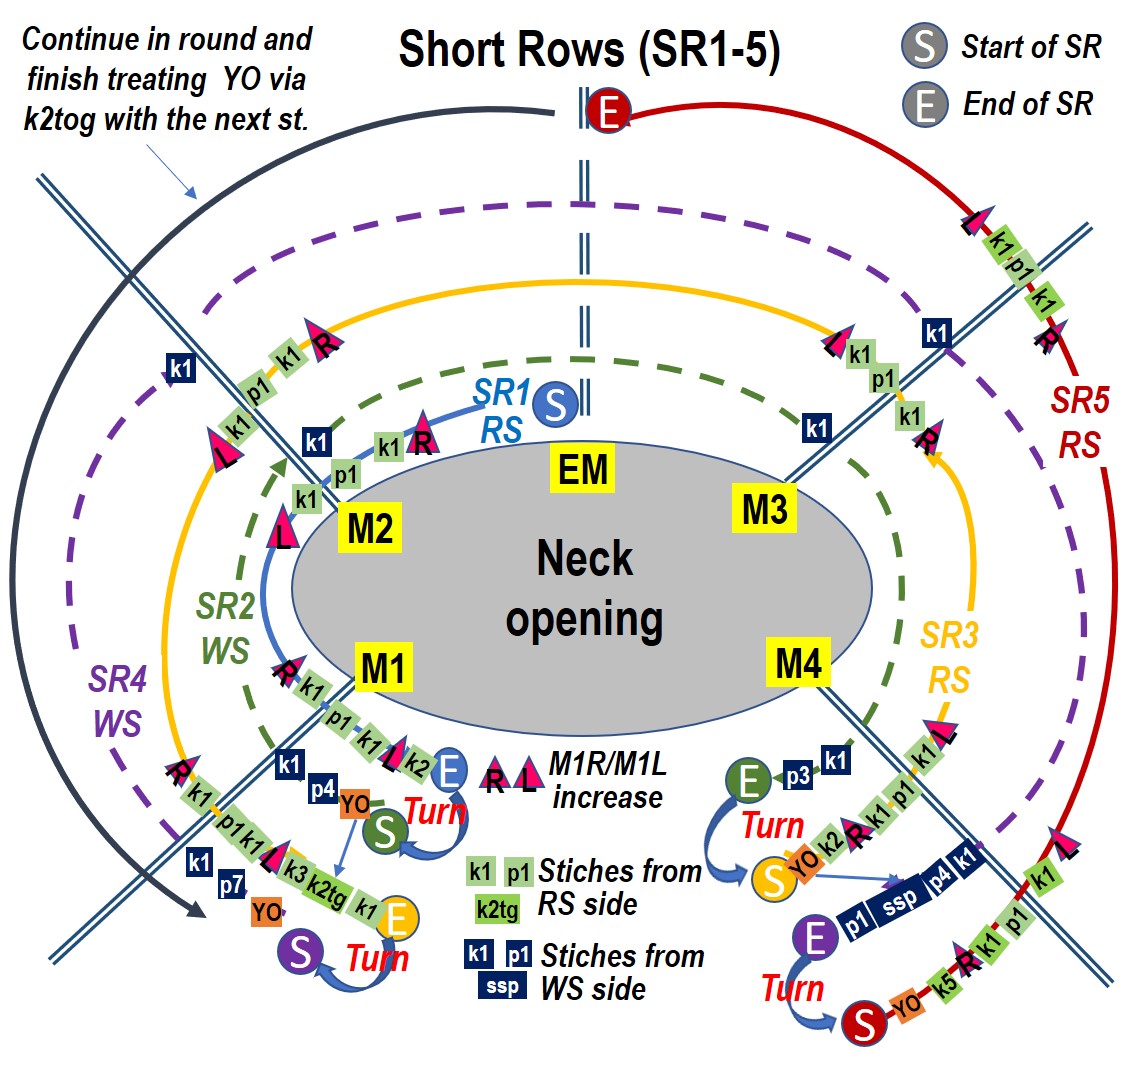
- SR2 WS – You will be turning back to cross M1, M2, EM, M3, M4. YO, p4, k1 (for the raglan ridge), SM1, purl (no increase) to M2, SM2, k1, purl to EM, SEM. Continue purl to 1 st before M3, k1, SM3, purl to M4, SM4, k1, p3, turn. 4 sts increase.
- SR3 RS – YO, k2, M1R, k1, p1, SM4, k1, M1L; knit to 1 st before M3, M1R, k1, SM3, p1, k1, M1L; knit to EM, SEM; knit to 2 sts before M2, M1R, k1, p1, SM2; k1, M1L, knit to 1 st before M1, M1R, k1, SM1; p1, k1, M1L, k3 to YO, k2tog with YO and the next k st, k1, turn. 8 sts increase.
- SR4 WS – YO, p7, k1, SM1, purl (no increase) to M2, SM2, k1, purl to EM, SEM. Continue purl to 1 st before M3, k1, SM3; purl to M4, SM4, k1, purl to YO, ssp with YO and the next p st, p2, turn.
- SR5 RS – YO, k5, M1R, k1, p1, SM4, k1, M1L; knit to 1 st before M3, M1R, k1, SM3, p1, k1, M1L, knit to EM, SEM
- At the end of short rows, there will be 44 / 44 / 52 / 52 sts for each front/back and 16 / 16 / 18 / 18 sts for each sleeve.
- As you continue to work, when you reach remaining YOs, k2tog with YO and the next k st.
Continue raglan yoke and start front lace pattern
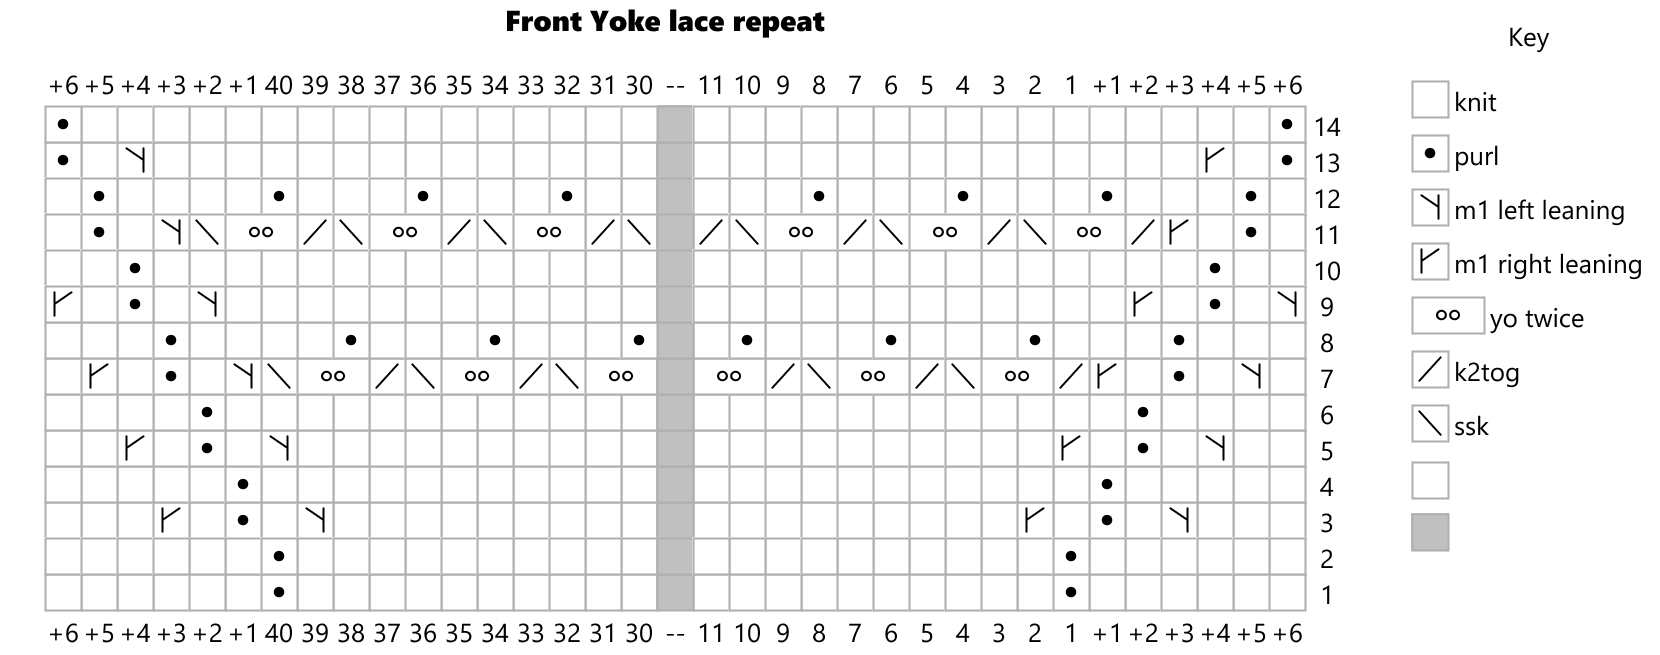
- As you continue to work in round with raglan increases, from Row 7 below, you are incorporating the 4-st/4-row lace repeats for the front yoke between M1 and M4.
- 4-st/4-row lace pattern in round:
- R1 [k2tog, yoyo, ssk]
- R2 [k1, {p1, k1 into double YO}, k1]
- R3 & R4 – knit
- The chart below shows the stitch schematics for S/M.
Continue raglan increases through the end of yoke
- Raglan increase in round starting from the center of back yoke (EM):
- Right back – knit to 2 st before M2, M1R, k1, p1, SM2
- Right sleeve – k1, M1L, knit to 1 st before M1, M1R, k1, SM1
- Front – p1, k1, M1L, knit or work 4-st/4-row lace repeat to 2 st before M4, M14, k1, p1, SM4
- Left sleeve – k1, M1L, knit to 1 st before M3, M1R, k1, SM3
- Left back – p1, k1, M1L, knit to EM
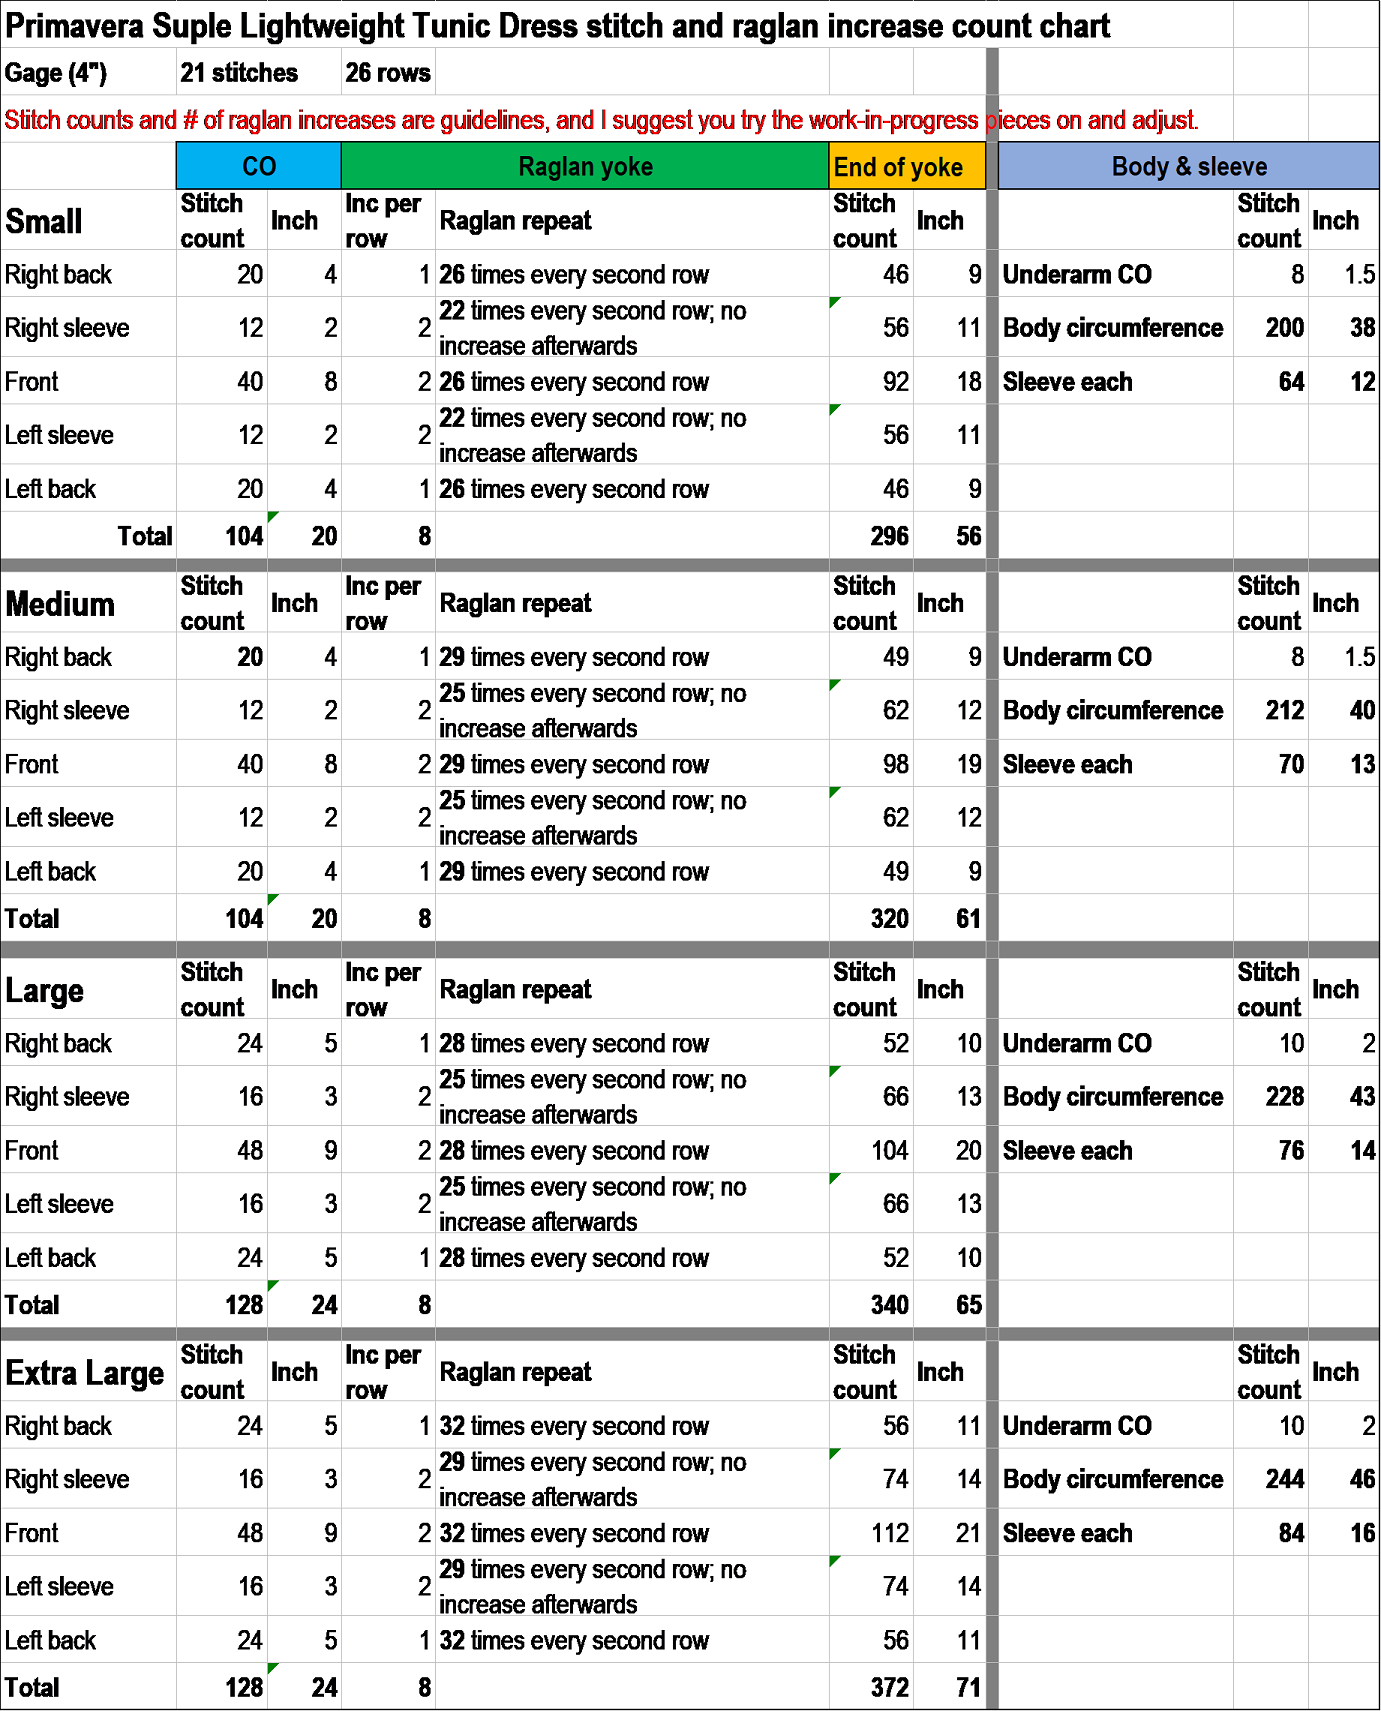
- Continue raglan increases as recommended in the chart above, and make adjustments after trying out work-in-progress piece, i.e.:
- Small – 26 times for body; 22 times for sleeve, and no increase afterwards.
- Medium – 29 times for body; 25 times for sleeve, and no increase afterwards.
- Large – 28 times for body; 25 times for sleeve, and no increase afterwards.
- Extra large – 32 times for body; 29 times for sleeve, and no increase afterwards.
- At the end of the raglan increases, you will have 92 / 98 / 104 / 112 sts for each front/back body and 56 / 62 / 66 / 74 sts for each sleeve before adding underarm sts.
- For front yoke lace pattern, stop when it reached your desired depth – in this sample, to 4″, or 8 pattern repeat rows.
Separate sleeves from the body
You are ready to separate body and sleeves by holding sleeves in stitch holders or waste yarns, and adding underarm sts.
- Underarm sts:
- Recommended # of sts is 8 (including two M1 sts in Round 2) and you can make adjustments based on your preference.
- Backwards loop CO is used here, and please feel free use your preferred method.
- To add further flexibility in ease, the underarm sts both in body and sleeves are knit in k1/p1 rib.
- First round – From EM, knit to M2, remove M2, CO 6 sts; transfer right sleeve sts between M2 and M1 to stitch holder or waster yarn; remove M1, continue to knit to M4, remove M4, CO 6 sts; transfer left sleeve sts between M4 and M3 to stitch holder or waster yarn; remove M4, continue to knit to EM.
- 2nd round
- To avoid “holes” for the raglan underarm, you will be adding M1 at the beginning and the end of each underarm CO, making the total # of underarm sts to 8.
- Knit until the beginning of 1st underarm CO, M1, k6, M1; continue to knit to 2nd underarm CO, M1, k6, M1; knit to EM.
- 3rd round and onward – continue to knit in round and incorporate k1/p1 rib in underarm if you’d like.
Body
You will continue to work body in round until it reaches the desired length for starting side slits.
(Optional) vertical darts: You can shape waist by incorporating vertical darts as below.
- Place markers – when the body measures about 2-3″ from the underarm, k23/ 24 / 26 / 28 sts from EM, PM; k54 / 58 / 62 / 66 sts, PM; knit 46 / 48 / 52 / 56 sts, PM; knit 64 / 58 / 62 / 66 sts, PM, knit 23 / 24 / 26 / 28 sts to EM
- Darts shaping decrease – [knit to M, k2tog, SM, knit 2 st before M, ssk, SM] twice per 1 round; knit to EM. 4 sts decreased.
- Work this round every 6th row 3 times. 12 sts decreased in total.
- Work even for for 12 – 16 rows. Make adjustments according to the length of your torso.
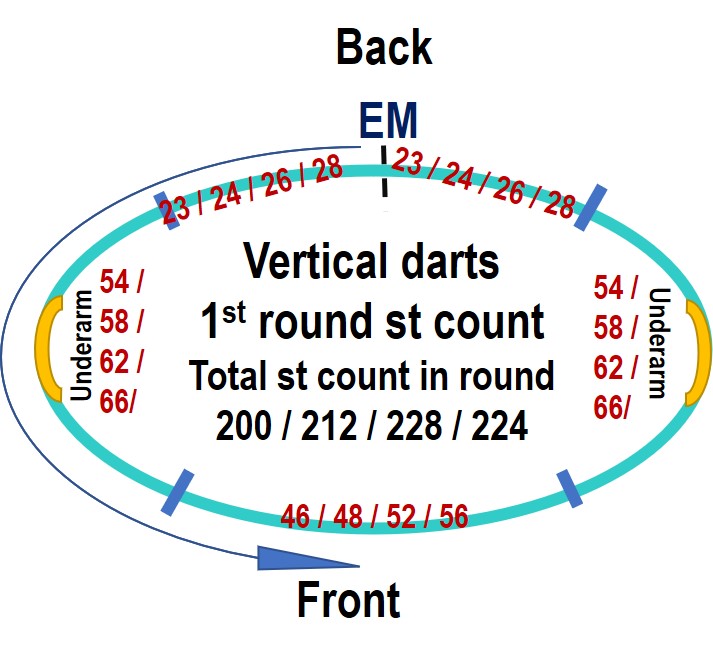
- Darts shaping increase – [knit to M, M1L, SM, knit to M, SM, M1R] twice per 1 round; knit to EM. 4 sts increased.
- Work this round every 6th row 3 times. 12 sts increase total, back to the beginning st counts.
(Optional) side slits and crochet trim
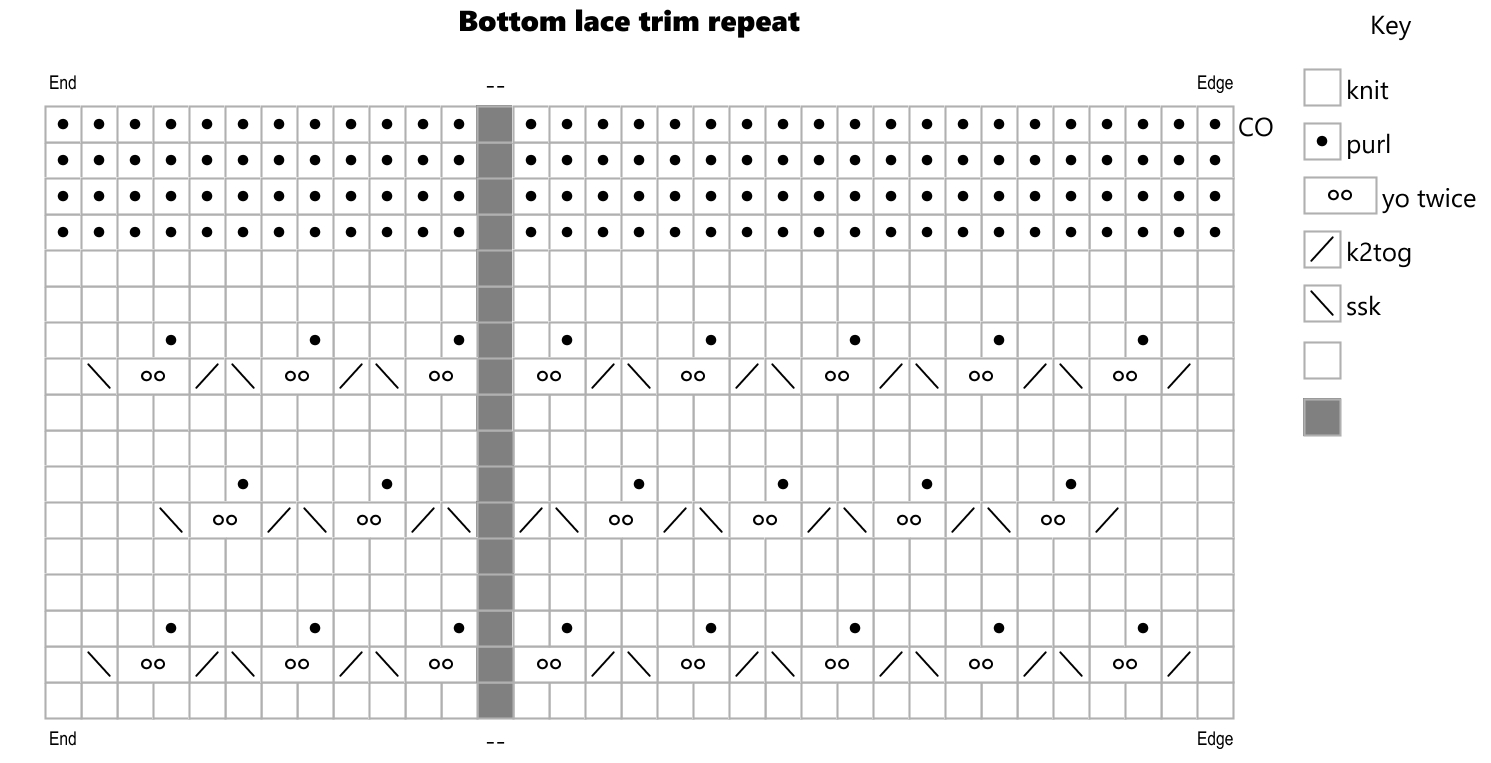
Continue to work in round until the body reaches your desired length, and start side slits. In this sample, it starts about 16″ from underarm. I actually made it too deep at first, and had to sew the sides up a few inches after wearing it.
- Separate front & back and work in flat. In this case, back is about 3″ longer.
- Front – when it reaches about 6-8″, start the 4-st/4-row lace repeat for 3 rounds. End with 3 rows of reverse stockinette edge and CO.
- Back – when it reaches about 9 – 11″, start the 4-st/4-row lace repeat for 3 rounds. End with 3 rows of reverse stockinette edge and CO.
- Trim – Using a contrasting color, crochet 2 rows of single crochet stitch on both sides.
Sleeves
- Transfer 56 / 62 / 66 / 74 sts to #4 16″ circular needle, pick up underarm sts (8), join, and work in round until it reaches about 9″. If you prefer full-length sleeves, knit for another 3 – 5″, depending on your arm length.
- Trumpet lace sleeve – following the raglan front hoke pattern, in the middle of underarm, start the 4-st/4-row lace repeat, increasing 2 sts on every 1st and 3rd rows of lace repeat until it reaches the desired length. This sample has 9 repeats/36 rows/5″.
- Edge – work 3 rows of reverse stockinette st and CO.
Neck
Unravel provisional CO sts to #4 circular needle and work 4 rows of reverse stockinette st and CO very loosely.
Optional stripe details
You can incorporate narrow stripes in a contrasting color at a few spots. In that case, carry over the main working yarn, i.e., do not cut. In this sample:
- 2-row stripe about 1/2″ after the lace pattern ends.
- 3-row stripe about 3″ after the yoke ends/underarm.
- Neck trim after unraveling the provisional CO
- Side slit trims.
Weave the ends, finish, and enjoy the airy lightness! This fabric hardly requires blocking and I steamed lightly in shape/measurement.


wouldlikebutcannot | 19th Apr 22
this is very complex …. my head hurts; have to take a break